I thought I knew C# : Garbage collection & disposal. Part-II

Okay, we are back in to collect “garbage” properly. If you haven’t the first part of this post you might want to read it here. We are following norms and conventions from the first post here too.

 Starting things from where we left off:

This write up continues after the first one where we ended things with SafeHandle class and IDisposable  interface. I do see how intriguing this is of course. But before that, like a unexpected, miserable commercial break before the actual stuff comes on your TV, let’s go have a look on something called finalization.

What you create, you “might” need to destroy:

If you know a little bit of C++ you’d know that there is a thing called destructor and the name implies it does the exactly opposite of what a constructor does. C++ kind of needs it since it doesn’t really have a proper garbage collection paradigm. But that also raises the question of whether C# has a destructor and if it does what does it do and why do we even have one since we said managed resourced would be collected automatically.

Lets jump onto some code, shall we?

class Cat
{
    ~Cart()
    {
        // cleanup things
    }
}

Wait a minute, now this is getting confusing. I have IDisposable::Dispose() and I have a destructor. Both looks like to have same responsibility. Not exactly. Before we confuse ourselves more, lets dig a bit more in the code. To be honest, C# doesn’t really have a destructor, it’s basically a syntactic sugar and inside c sharp compiler translates this segment as

protected override void Finalize()
{
    try
    {
        // Clean things here
    }
    finally
    {
        base.Finalize();
    }
}

We can pick up to things here. First thing is the destructor essentially translates to a overridden Finalize() method. And it also calls the Finalize() base class in the finally block. So, it’s essentially a recursive finalize(). Wait, we have no clue what is Finalize().

Finalize, who art thou?

Finalize is somebody who is blessed to talk with the garbage collector. If you have already questioning where the topics we discussed in last post comes in help, this is the segment. Lets start getting answers for all our confusions on last segment. First, why Finalize is overridden and where does it gets its signature. Finalize gets its signature from Object class. Okay, understandable. What would be the default implementation then? Well, it doesn’t have a default implementation. You might ask why. A little secret to slip in here, remember the mark step of garbage collector. He marks a type instance for finalization if and only if it has overridden the Finalize() method. It’s your way of telling the garbage collector that you need to do some more work before you can reclaim my memory. Garbage collector would mark this guy and put him in a finalization queue which is essentially a list of objects whose finalization codes must be run before GC can reclaim their memory. So, you are possibly left with one more confusion now. And that is, you understood garbage collector uses this method to finalize things, i.e. doing the necessary cleanup. Now, then why do we need IDisposable where we can just override finalize and be done with it, right?

Dispose, you confusing scum!

Turns out dispose intends to point out a pattern in code that you can use to release unmanaged memory. What I didn’t tell you about garbage collector before is you don’t really know when he would essentially do that, you practically have no clue. That also means if you write an app that uses unmanaged resources like crazy like reading 50-60 files at a time, you are using a lot of scarce resources at the same time. And in the end you are waiting for GC to do his job but that guy has no time table. So, hoarding these resources is not a good idea in the meantime. Since releasing unmanaged resources are developers duty, putting that over a finalize method  and waiting for GC to come and invoke that is a stupid way to go. Moreover, if you send an instance to a finalization queue, it means, GC will essentially do the memory cleanup in the next round, he will only invoke finalize this round. That also means GC has to visit you twice to clear off your unused occupied memory which you kinda need now. And the fact that you might want to release the resources NOW is a pretty good reason itself to not wait for GC to do your dirty work. And, when you actually shut down your application, Mr. GC visits you unconditionally and takes out EVERYONE he finds. I hope the need of Dispose() is getting partially clear to you now. We need a method SomeMethod() that we can call which would clean up the unmanaged resources. If we fail to call that at some point, just to make sure garbage collector can call that we will use that same method inside Finalize() so it is called anyhow. If I have not made a fool out of myself at this point, you have figured out the fact that SomeMethod() is Dispose(). Okay, so we know what we are going to do. Now we need to act on it. We will implement the dispose pattern we have been talking about. The first thing we would do here is we would try to write code that reads a couple of lines from a file. We would try to do it the unmanaged way, then move it to slowly to the managed way and in the process we would see how we can use IDisposable there too.

Doing things the unsafe way:

I stole some code from a very old msdn doc which describes a FileReader class like the following:

using System;
using System.Runtime.InteropServices;
public class FileReader
{
    const uint GENERIC_READ = 0x80000000;
    const uint OPEN_EXISTING = 3;
    IntPtr handle;
[DllImport("kernel32", SetLastError = true)]
    static extern unsafe IntPtr CreateFile(
            string FileName,                    // file name
            uint DesiredAccess,                 // access mode
            uint ShareMode,                     // share mode
            uint SecurityAttributes,            // Security Attributes
            uint CreationDisposition,           // how to create
            uint FlagsAndAttributes,            // file attributes
            int hTemplateFile                   // handle to template file
            );
[DllImport("kernel32", SetLastError = true)]
    static extern unsafe bool ReadFile(
            IntPtr hFile,                       // handle to file
            void* pBuffer,                      // data buffer
            int NumberOfBytesToRead,            // number of bytes to read
            int* pNumberOfBytesRead,            // number of bytes read
            int Overlapped                      // overlapped buffer
            );
[DllImport("kernel32", SetLastError = true)]
    static extern unsafe bool CloseHandle(
            IntPtr hObject   // handle to object
            );
    public bool Open(string FileName)
    {
        // open the existing file for reading
        handle = CreateFile(
                FileName,
                GENERIC_READ,
                0,
                0,
                OPEN_EXISTING,
                0,
                0);
if (handle != IntPtr.Zero)
            return true;
        else
            return false;
    }
    public unsafe int Read(byte[] buffer, int index, int count)
    {
        int n = 0;
        fixed (byte* p = buffer)
        {
            if (!ReadFile(handle, p + index, count, &n, 0))
                return 0;
        }
        return n;
    }
    public bool Close()
    {
        // close file handle
        return CloseHandle(handle);
    }
}

Please remember you need to check your Allow Unsafe Code checkbox in your build properties before you start using this class. Lets have a quick run on the code pasted here. I don’t intend to tell everything in details here because that is not the scope of this article. But we will build up on it, so we need to know a little bit. The DllImport attribute here is essentially something  you would need to use an external dll (thus unmanaged) and map the functions inside it to your own managed class. You can also see that’s why we have used the extern keyword here. The implementations of these methods doesn’t live in your code and thus your garbage collector can’t take responsibility of clean up here. 🙂 The next thing you would notice is the fixed statement. fixed statement essentially link up a managed type to an unsafe one and thus make sure GC doesn’t move the managed type when it collects. So, the managed one stays in one place and points to the unmanaged resource perfectly. So, what are we waiting for? Lets read a file.

static int Main(string[] args)
{
    if (args.Length != 1)
    {
        Console.WriteLine("Usage : ReadFile <FileName>");
        return 1;
    }
    if (!System.IO.File.Exists(args[0]))
    {
        Console.WriteLine("File " + args[0] + " not found.");
        return 1;
    }
    byte[] buffer = new byte[128];
    FileReader fr = new FileReader();
    if (fr.Open(args[0]))
    {
        // Assume that an ASCII file is being read
        ASCIIEncoding Encoding = new ASCIIEncoding();
        int bytesRead;
        do
        {
            bytesRead = fr.Read(buffer, 0, buffer.Length);
            string content = Encoding.GetString(buffer, 0, bytesRead);
            Console.Write("{0}", content);
        }
        while (bytesRead > 0);
        fr.Close();
        return 0;
    }
    else
    {
        Console.WriteLine("Failed to open requested file");
        return 1;
    }
}

So, this is essentially a very basic console app and looks somewhat okay. I have created a byte array of size 128 which I would use as a buffer when I read. FileReader returns 0 when it can’t read anymore. Don’t get confused seeing this.

while (bytesRead > 0)

It’s all nice and dandy to be honest. And it works too. Invoke the application (in this case the name here is  TestFileReading.exe) like the following:

TestFileReading.exe somefile.txt

And it works like a charm. But what I did here is we closed the file after use. What if something happens in the middle, something like the file not being available. Or I throw an exception in the middle. What will happen is the file would not be closed up until my process is not closed. And the GC will not take care of it because it doesn’t have anything in the Finalize() method.

Making it safe:

public class FileReader: IDisposable
{
    const uint GENERIC_READ = 0x80000000;
    const uint OPEN_EXISTING = 3;
    IntPtr handle = IntPtr.Zero;
    [DllImport("kernel32", SetLastError = true)]
    static extern unsafe IntPtr CreateFile(
            string FileName,                 // file name
            uint DesiredAccess,             // access mode
            uint ShareMode,                // share mode
            uint SecurityAttributes,      // Security Attributes
            uint CreationDisposition,    // how to create
            uint FlagsAndAttributes,    // file attributes
            int hTemplateFile          // handle to template file
            );
    [DllImport("kernel32", SetLastError = true)]
    static extern unsafe bool ReadFile(
            IntPtr hFile,                   // handle to file
            void* pBuffer,                 // data buffer
            int NumberOfBytesToRead,      // number of bytes to read
            int* pNumberOfBytesRead,     // number of bytes read
            int Overlapped              // overlapped buffer
            );
    [DllImport("kernel32", SetLastError = true)]
    static extern unsafe bool CloseHandle(
            IntPtr hObject   // handle to object
            );
    public bool Open(string FileName)
    {
        // open the existing file for reading
        handle = CreateFile(
                FileName,
                GENERIC_READ,
                0,
                0,
                OPEN_EXISTING,
                0,
                0);
        if (handle != IntPtr.Zero)
            return true;
        else
            return false;
    }
    public unsafe int Read(byte[] buffer, int index, int count)
    {
        int n = 0;
        fixed (byte* p = buffer)
        {
            if (!ReadFile(handle, p + index, count, &n, 0))
                return 0;
        }
        return n;
    }
    public bool Close()
    {
        // close file handle
        return CloseHandle(handle);
    }
    public void Dispose()
    {
        if (handle != IntPtr.Zero)
            Close();
    }
}

Now, in our way towards making things safe, we implemented IDisposable here. That exposed Dispose() and the first thing I did here is we checked whether the handle is IntPtr.Zero and if it’s not we invoked Close(). Dispose() is written this way because it should be invokable in any possible time and it shouldn’t throw any exception if it is invoked multiple times. But is it the solution we want? Look closely. We wanted to have a Finalize() implementation that will essentially do the same things if somehow Dispose() is not called. Right?

Enter the Dispose(bool) overload. We want the parameter less Dispose() to be used by only the external consumers. We would issue a second Dispose(bool) overload where the boolean parameter indicates whether the method call comes from a Dispose method or from the finalizer. It would be true if it is invoked from the parameter less Dispose() method.

With that in mind our code would eventually be this:

    public class FileReader: IDisposable
    {
        const uint GENERIC_READ = 0x80000000;
        const uint OPEN_EXISTING = 3;
        IntPtr handle = IntPtr.Zero;
        private bool isDisposed;

        SafeHandle safeHandle = new SafeFileHandle(IntPtr.Zero, true);

        [DllImport("kernel32", SetLastError = true)]
        static extern unsafe IntPtr CreateFile(
              string FileName,                  // file name
              uint DesiredAccess,              // access mode
              uint ShareMode,                 // share mode
              uint SecurityAttributes,       // Security Attributes
              uint CreationDisposition,     // how to create
              uint FlagsAndAttributes,     // file attributes
              int hTemplateFile           // handle to template file
              );

        [DllImport("kernel32", SetLastError = true)]
        static extern unsafe bool ReadFile(
             IntPtr hFile,                // handle to file
             void* pBuffer,              // data buffer
             int NumberOfBytesToRead,   // number of bytes to read
             int* pNumberOfBytesRead,  // number of bytes read
             int Overlapped           // overlapped buffer
             );

        [DllImport("kernel32", SetLastError = true)]
        static extern unsafe bool CloseHandle(
              IntPtr hObject   // handle to object
              );

        public bool Open(string FileName)
        {
            // open the existing file for reading
            handle = CreateFile(
                  FileName,
                  GENERIC_READ,
                  0,
                  0,
                  OPEN_EXISTING,
                  0,
                  0);

            if (handle != IntPtr.Zero)
                return true;
            else
                return false;
        }

        public unsafe int Read(byte[] buffer, int index, int count)
        {
            int n = 0;
            fixed (byte* p = buffer)
            {
                if (!ReadFile(handle, p + index, count, &n, 0))
                    return 0;
            }
            return n;
        }

        public bool Close()
        {
            // close file handle
            return CloseHandle(handle);
        }

        public void Dispose()
        {
            Dispose(true);
            GC.SuppressFinalize(this);
        }

        protected virtual void Dispose(bool isDisposing)
        {
            if (isDisposed)
                return;

            if (isDisposing)
            {
                safeHandle.Dispose();
            }

            if (handle != IntPtr.Zero)
                Close();

            isDisposed = true;
        }
    }

Now if you focus on the changes we made here is introducing the following method:

protected virtual void Dispose(bool isDisposing)

Now, this method envisions what we discussed a moment earlier. You can invoke it multiple times without any issue. There are two prominent block here.

  • The conditional block is supposed to free managed resources (Read invoking Dispose() methods of other IDisposable member/properties inside the class, if we have any.)
  • The non-conditional block frees the unmanaged resources.

You might ask why the conditional block tries to dispose managed resources. The GC takes care of that anyway right? Yes, you’re right. Since garbage collector is going to take care of the managed resources anyway, we are making sure the managed resources are disposed on demand if only someone calls the parameter less Dispose(). 

Are we forgetting something again? Remember, you have unmanaged resources and if somehow the Dispose() is not invoked you still have to make sure this is finalized by the garbage collector. Let’s write up a one line destructor here.

 ~FileReader()
 {
    Dispose(false);
 }

It’s pretty straightforward and it complies with everything we said before. Kudos! We are done with FileReader.

Words of Experience:

Although we are safe already. We indeed forgot one thing. If we invoke Dispose() now it will dispose unmanaged and managed resources both. That also means when the garbage collector will come to collect he will see there is a destructor ergo there is a Finalize() override here. So, he would still put this instance into Finalization Queue. That kind of hurts our purpose. Because we wanted to release memory as soon as possible. If the garbage collector has to come back again, that doesn’t really make much sense. So, we would like to suppress the garbage collector to invoke Finalize() if we know we have disposed it ourselves. And a single line modification to the Dispose() method would allow you to do so.

public void Dispose()
{
    Dispose(true);
    GC.SuppressFinalize(this);
}

We added the following statement to make sure if we have done disposing ourselves the garbage collector would not invoke Finalize() anymore.

GC.SuppressFinalize(this);

Now, please keep in mind that you shouldn’t write a GC.SupperssFinalize() in a derived class since your dispose method would be overridden and you would follow the same pattern and call base.Dispose(isDisposing) in the following way:

class DerivedReader : FileReader
{
   // Flag: Has Dispose already been called?
   bool disposed = false;

   // Protected implementation of Dispose pattern.
   protected override void Dispose(bool disposing)
   {
      if (disposed)
         return; 

      if (disposing) {
         // Free any other managed objects here.
         //
      }

      // Free any unmanaged objects here.
      //
      disposed = true;

      // Call the base class implementation.
      base.Dispose(disposing);
   }

   ~DerivedClass()
   {
      Dispose(false);
   }
}

It should be fairly clear to now why we are doing it this way. We want disposal to go recursively to base class. So, when we dispose the derived class resources, the base class disposes its own resources too.

To use or not to use a Finalizer:

We are almost done, really, we are. This is a section where Im supposed to tell you why you really shouldn’t use unmanaged resources whenever you need. It’s always a good idea not to write a Finalizer if you really really don’t need it. Currently we need it because you are using a unsafe file handle and we need to close it manually. To keep destructor free and as managed as possible, we should always wrap our handles in SafeHandle class and dispose the SafeHandle as a managed resource. Thus, eliminating the need for cleaning unmanaged resources and the overloaded Finalize() . You will find more about that here.

“Using” it right:

Before you figure out why I quoted the word using here, let’s finally wrap our work up. We have made our FileReader class disposable and we would like to invoke dispose() after we are done using it. We would opt for a try-catch-finally block to do it and will dispose the resources in the finally block.

FileReader fr = new FileReader();
try
{
    if (fr.Open(args[0]))
    {
        // Assume that an ASCII file is being read
        ASCIIEncoding Encoding = new ASCIIEncoding();
        int bytesRead;
        do
        {
            bytesRead = fr.Read(buffer, 0, buffer.Length);
            string content = Encoding.GetString(buffer, 0, bytesRead);
            Console.Write("{0}", content);
        }
        while (bytesRead > 0);
        return 0;
    }
    else
    {
        Console.WriteLine("Failed to open requested file");
        return 1;
    }
}
finally
{
    if (fr != null)
        fr.Dispose();
}

The only difference you see here that we don’t explicitly call Close() anymore. Because that is already handled when we are disposing the FileReader instance.

Good thing for you is that C# has essentially made things even easier than this. Remember the using statements we used in Part-I? An using statement is basically a syntactic sugar placed on a try-finally block with a call to Dispose() in the finally block just like we wrote it here. Now, with that in mind, our code-block will change to:

using (FileReader fr = new FileReader())
{
    if (fr.Open(args[0]))
    {
        // Assume that an ASCII file is being read
        ASCIIEncoding Encoding = new ASCIIEncoding();
        int bytesRead;
        do
        {
            bytesRead = fr.Read(buffer, 0, buffer.Length);
            string content = Encoding.GetString(buffer, 0, bytesRead);
            Console.Write("{0}", content);
        }
        while (bytesRead > 0);
        return 0;
    }
    else
    {
        Console.WriteLine("Failed to open requested file");
        return 1;
    }
}

Now you can go back to part-I and try to understand the first bits of code we saw. I hope it would make a bit better sense to you now. Hope you like it. Hopefully, if there’s a next part, I would talk about garbage collection algorithms.

You can find the code sample over github here.
Windows Phone For Newbies – Geofencing in Windows Phone 8.1 WinRT

Geofencing was one of the newest features Windows Phone 8.1 provided and for the developers it indeed was cool. Previously people did it their way but it’s always better to have an api in our hand. So, before digging into that i strongly suggest you guys to read my previous 2 articles if you haven’t done it already.

1. The Complete Reference of Map Control in Windows Phone 8.1 RT

2. Tracking Location in Windows Phone 8.1

These two would get you started pretty fast and you’d probably want that. If you already read my aforementioned 2 articles, I expect you know how to use a map control in Windows Phone 8.1. We’re going to need that later.

Geofencing:

Geofencing is a mechanism where you put a virtual boundary around a specific point of interest and you want to interact with the user when you arrive or leave that specific boundary. You seriously can do pretty amazing stuff with it actually.

Initial Work:

Now, let’s take a more practical approach to this, every time I go into my room, Im supposed to check my mails. But I usually forget that. How cool it would be if my phone reminds me every time I get into my room and tells me to check my mail?  😉

So, let’s go ahead and create a new Windows Phone app and name it GeoFencingTest. Now, lets see how to do that actually.

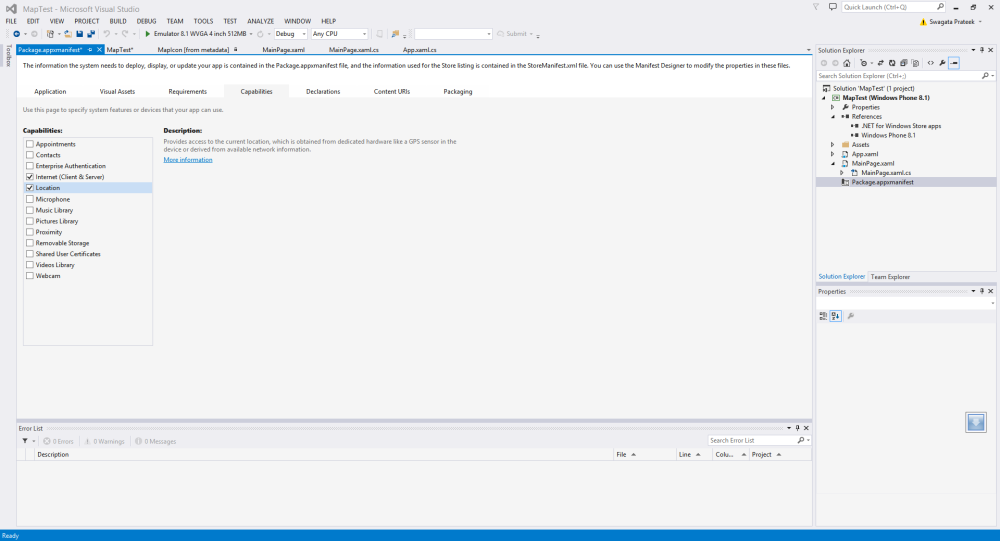
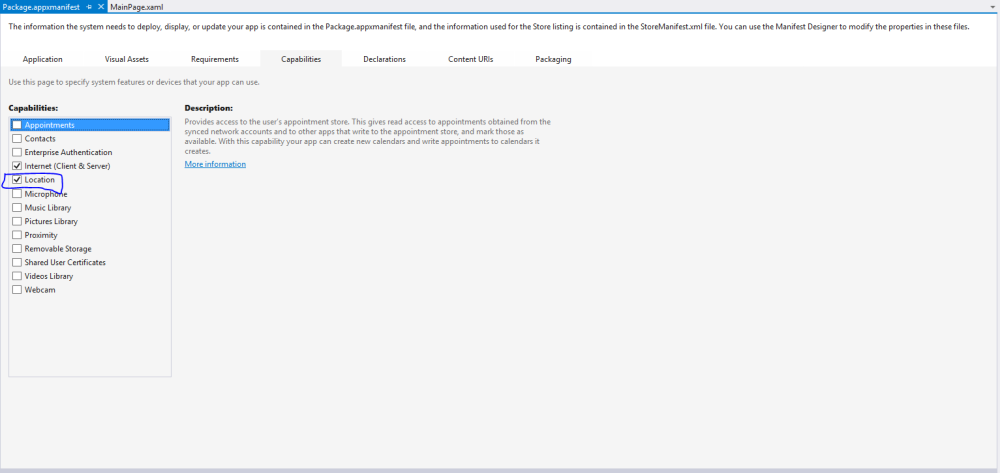
So, first of all go over your Package.appxmanifest file and go to the Capabilities Tab and select the Location capability.

Geofencing 1

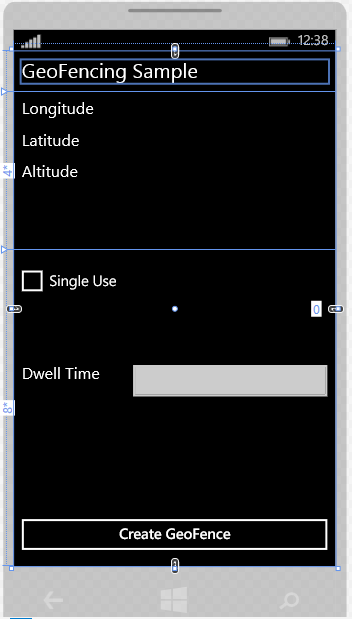
Now, when you are done with that, let’s move on and start cracking. Before going deep lets get a basic UI running. And it looks like following:

GeoFencing - 2

And on the XAML part it looks like the following:

    <Grid>
        <Grid.RowDefinitions>
            <RowDefinition Height="Auto"></RowDefinition>
            <RowDefinition Height="4*"></RowDefinition>
            <RowDefinition Height="8*"></RowDefinition>
        </Grid.RowDefinitions>
        

        <Grid Grid.Row="0">
            <TextBlock Text="GeoFencing Sample" FontSize="25" Margin="10"/>
        </Grid>

        <Grid Grid.Row="1">
            <Grid.ColumnDefinitions>
                <ColumnDefinition></ColumnDefinition>
                <ColumnDefinition></ColumnDefinition>
            </Grid.ColumnDefinitions>

            <StackPanel Margin="10">
                <TextBlock Text="Longitude" Margin="0,0,0,15"  FontSize="20"></TextBlock>
                <TextBlock Text="Latitude"  Margin="0,0,0,15" FontSize="20"></TextBlock>
                <TextBlock Text="Altitude"  Margin="0,0,0,15" FontSize="20"></TextBlock>
            </StackPanel>

            <StackPanel Grid.Column="1" Margin="10">
                <TextBlock Name="Longitude" Margin="0,0,0,15"  FontSize="20"></TextBlock>
                <TextBlock Name="Latitude"  Margin="0,0,0,15" FontSize="20"></TextBlock>
                <TextBlock Name="Altitude"  Margin="0,0,0,15" FontSize="20"></TextBlock>
            </StackPanel>

        </Grid>

        <Grid Grid.Row="2" Margin="10">
            <Grid.ColumnDefinitions>
                <ColumnDefinition Width="4*"></ColumnDefinition>
                <ColumnDefinition Width="7*"></ColumnDefinition>
            </Grid.ColumnDefinitions>
            <Grid.RowDefinitions>
                <RowDefinition></RowDefinition>
                <RowDefinition></RowDefinition>
                <RowDefinition></RowDefinition>
            </Grid.RowDefinitions>

            <CheckBox Content="Single Use"></CheckBox>
            <TextBlock Grid.Row="1" FontSize="20" Text="Dwell Time" Margin="0,8,0,0"/>
            <TextBox Grid.Column="1" Name="DwellTime"  Grid.Row="1"/>

            <Button x:Name="CreateGeoFencingButton" Grid.Row="2" Grid.ColumnSpan="2" Content="Create GeoFence" HorizontalAlignment="Stretch" VerticalAlignment="Bottom"/>
            
        </Grid>

    </Grid>

Before going in deep on what is for what let’s get some basic stuff done. Let’s get our current location first.

Since you guys have seen in the last articles, it’s fairly easy to do so. All I’m doing here is get the current location using Geolocator and put the Latitude, Longitude and Altitude into the textblocks defined in the MainPage.xaml.

    public sealed partial class MainPage : Page
    {
        Geolocator geolocator = new Geolocator();
        CancellationTokenSource CancellationTokenSrc = new CancellationTokenSource();

        public MainPage()
        {
            this.InitializeComponent();

            this.NavigationCacheMode = NavigationCacheMode.Required;
        }

        protected override void OnNavigatedTo(NavigationEventArgs e)
        {

            InitializeLocation();

        }

        async private void InitializeLocation()
        {
            try
            {

                geolocator = new Geolocator();

                CancellationTokenSrc = new CancellationTokenSource();
                CancellationToken token = CancellationTokenSrc.Token;

                var position = await geolocator.GetGeopositionAsync(TimeSpan.FromSeconds(1), TimeSpan.FromSeconds(30)).AsTask(token);

                Longitude.Text = position.Coordinate.Point.Position.Longitude.ToString();
                Latitude.Text = position.Coordinate.Point.Position.Latitude.ToString();
                Altitude.Text = position.Coordinate.Point.Position.Altitude.ToString();
            }

            catch (Exception)
            {
                if (geolocator.LocationStatus == PositionStatus.Disabled)
                {
                    ShowMessage("Location Services are turned off");
                }

            }
            finally
            {
                CancellationTokenSrc = null;
            }

        }

        private async void ShowMessage(string message)
        {
            MessageDialog dialog = new MessageDialog(message);
            await dialog.ShowAsync();
        }
    }

The only thing that is interesting here is having a CancellationToken generated from a CancellationTokenSource. Usually these are used if you really want control over your task after it’s being fired, the rest of the procedure should look familiar as it’s a basic Geolocator usage to find current geolocation.

Setting up a GeoFence:

Now comes the setting up the actual GeoFence part and even this is fairly simple. The method looks like the following:

        Geofence geofence = null;
        int DefaultDwellTimeInSeconds = 0;
        private void SetupGeofence()
        {
            //Set up a unique key for the geofence
            string GeofenceKey = "My Home Geofence";
            BasicGeoposition GeoFenceRootPosition = GetMyHomeLocation();

            double Georadius = 500;

            // the geocircle is the circular region that defines the geofence
            Geocircle geocircle = new Geocircle(GeoFenceRootPosition, Georadius);

            bool singleUse = (bool)SingleUse.IsChecked;

            //Selecting a subset of the events we need to interact with the geofence
            MonitoredGeofenceStates GeoFenceStates = 0;

            GeoFenceStates |= MonitoredGeofenceStates.Entered;
            GeoFenceStates |= MonitoredGeofenceStates.Exited;

            // setting up how long you need to be in geofence for enter event to fire
            TimeSpan dwellTime;

            dwellTime = DwellTime.Text!=""? ParseTimeSpan(DwellTime.Text) : TimeSpan.FromSeconds(DefaultDwellTimeInSeconds);

            // setting up how long the geofence should be active
            TimeSpan GeoFenceDuration;
            GeoFenceDuration = TimeSpan.FromDays(10);

            // setting up the start time of the geofence
            DateTimeOffset GeoFenceStartTime = DateTimeOffset.Now;

            geofence = new Geofence(GeofenceKey, geocircle, GeoFenceStates, singleUse, dwellTime, GeoFenceStartTime, GeoFenceDuration);

            //Add the geofence to the GeofenceMonitor
            GeofenceMonitor.Current.Geofences.Add(geofence);

        }

        private TimeSpan ParseTimeSpan(string DwellTimeInSeconds)
        {
            return TimeSpan.FromSeconds(Double.Parse(DwellTimeInSeconds));

        }

        private static BasicGeoposition GetMyHomeLocation()
        {
            BasicGeoposition GeoFenceRootPosition;
            GeoFenceRootPosition.Latitude = 23.742766;
            GeoFenceRootPosition.Longitude = 90.417566;
            GeoFenceRootPosition.Altitude = 0.0;
            return GeoFenceRootPosition;
        }

Now, there’s quiet a lot to catch up.

The first one is definitely the GeofenceKey. Put a GeofenceKey in position just to identify a specific Geofence. I put s generic string to identify my home geofence.

Then I called up GetMyHomeLocation() method to set the geofence center to the location of my room. This will identify the center of our desired Geofence.

And the next thing to define is a radius that will define the radius of our circular geofence. We are using Geocircle object to define our geofence here, thus we are using a center and a radius in meters to defined our geofence. You can definitely see the next thing we did is define our geocircle. Actually the Geofence takes a Geoshape object to define it’s radius and currently only Geocircle is supported.

            string GeofenceKey = "My Home Geofence";
            BasicGeoposition GeoFenceRootPosition = GetMyHomeLocation();

            double Georadius = 500;

            // the geocircle is the circular region that defines the geofence
            Geocircle geocircle = new Geocircle(GeoFenceRootPosition, Georadius);

Now, we have put a checkbox in our XAML named SingleUse. This is supposed to define whether our geofence would be used for only one time or not. You can set up temporary one time used geofence using this.


bool singleUse = (bool)SingleUse.IsChecked;

Now, the next thing we did is we defined how our desired geofence would be treated. Which events are we considering with this geofence? Should this be fired only when we get into that geofence or should this will only be considered when we exit the geofence, or even we remove the geofence? We can actually select all or a subset of that group. So we used Logical OR operator to add up all the cases we want our geofence to react upon.


            MonitoredGeofenceStates GeoFenceStates = 0;

            GeoFenceStates |= MonitoredGeofenceStates.Entered;
            GeoFenceStates |= MonitoredGeofenceStates.Exited;

Let’s move on into the time domain now. Now we need to figure how long we need to stay in our favourite geofence to trigger up it’s desired events. I put a textbox in front to define that in seconds, if that is defined, we fire out events from our geofence in that number of seconds and if not we fire out events in our default dwell time defined by 0 seconds.

            // setting up how long you need to be in geofence for enter event to fire
            TimeSpan dwellTime;

            dwellTime = DwellTime.Text!=""? ParseTimeSpan(DwellTime.Text) : TimeSpan.FromSeconds(DefaultDwellTimeInSeconds);

You can even define how long a geofence should be up and running. Like I want my rooms geofence to be running for next 10 days.


            // setting up how long the geofence should be active
            TimeSpan GeoFenceDuration;
            GeoFenceDuration = TimeSpan.FromDays(10);

Even with that thing defined, one question remains, even though it will run for 10 days, when does the geofence gets activated so it can start counting to that defined 10 days. Answer is right below:


// setting up the start time of the geofence
            DateTimeOffset GeoFenceStartTime = DateTimeOffset.Now;

Well, the only thing left to do is create our desired geofence and add it to GeofenceMonitor.


            geofence = new Geofence(GeofenceKey, geocircle, GeoFenceStates, singleUse, dwellTime, GeoFenceStartTime, GeoFenceDuration);
            
            //Add the geofence to the GeofenceMonitor
            GeofenceMonitor.Current.Geofences.Add(geofence);

Now, that’s how you create your own geofence and add it to the GeofenceMonitor. Now you might wonder that whether you’d really have to define all that parameters to create a geofence. Not actually, the littlest you can do is define an Id and a Geocircle to start your geofence. 😉 The rest of the values would take the default assumption.

Handling GeoFence Notifications on Foreground:

We have all our background work to create a geofence but we wont be able to do a single thing unless we test our geofence. Now, we have already defined that our geofence would trigger events after the aforementioned dwellTime and will trigger events if I enter or leave it. So, I definitely have to attach a event handler at a certain place. Don’t I?

Before that, let’s create the method stub for the click event handler for CreateGeoFencingButton and start SetupGeofence() method inside it. If you don’t know how to do that, select the CreateGeoFencingButton in XAML, go to properties, select events tab and double click on the click textbox.


private void CreateGeoFencingButton_Click(object sender, RoutedEventArgs e)
{
SetupGeofence();
}

Then let’s add the handler in the end of SetupGeofence()


GeofenceMonitor.Current.GeofenceStateChanged += Current_GeofenceStateChanged;

Now, let’s say we want to show a message every time I enter and exit my room’s geofence. The handler might look like the following:

        private async void Current_GeofenceStateChanged(GeofenceMonitor sender, object args)
        {
            var Reports = sender.ReadReports();

            await Dispatcher.RunAsync(CoreDispatcherPriority.Normal, () =>
            {
                foreach (GeofenceStateChangeReport report in Reports)
                {
                    GeofenceState state = report.NewState;

                    Geofence geofence = report.Geofence;

                    if (state == GeofenceState.Entered)
                    {
                        ShowMessage("You are pretty close to your room");

                    }
                    else if (state == GeofenceState.Exited)
                    {

                        ShowMessage("You have left pretty far away from your room");
                    }
                }
            });
        }

There you go! That’s how you set up your geofence in an app running in the foreground.

Setting up GeoFence on the background:

Now, this is where things get a little bit tricky. There’s a number of steps involved in this.

  1. Create a Windows Runtime Component Project and add it to your solution.
  2. Change Package.appxmanifest to declare the BackgroundTask that has been created.
  3. Register the BackgroundTask
  4. Handle Geofence Notifications from Background Task

Create a Windows Runtime Component Project:

Usually, background tasks are windows runtime component so you have to add one to your solution. Please go over to your solution and add a Windows Runtime Project.

GeoFencing - 3

GeoFencing - 4

After the new project is created go over class1.cs and rename it to your liking . I renamed it to BackgroundTask and added IBackgroundTask interface to the class and implemented it. I didn’t write anything afterwards. Let’s just keep it like that for a while and move to our GeofenceTest Project. Go over references and   add the newly created GeofenceTask.BackgroundGeofenceTask project to it. So our Wp8.1 project now has reference to the GeofenceTask.BackgroundGeofenceTask project.

Change Package.appxmanifest to declare the BackgroundTask:

Now let’s scoot over to our Package.appxmanifest file and go over Declarations tab. From Available Declarations combobox select BackgroundTask and select loction under the Properties list.

GeoFencing - 5

Now on the Entry point field please put the full qualified assembly name of your newly created background task. Don’t get confused. It’s fairly easy. Let’s have a look at BackgroundGeofenceTask class first.

namespace GeofenceTask
{
    public sealed class BackgroundGeofenceTask : IBackgroundTask
    {
        public void Run(IBackgroundTaskInstance taskInstance)
        {
            throw new NotImplementedException();
        }
    }
}

Now put the name as (namespace.classname) format so that leaves us with GeofenceTask.BackgroundGeofenceTask

GeoFencing - 6

Register the BackgroundTask:

Now comes the part where you register the BackgroundTask. We need to register the background task to the app so it knows it to invoke it on time.  The registering method looks like following:

private async Task RegisterBackgroundTask()
        {
            BackgroundAccessStatus backgroundAccessStatus = await BackgroundExecutionManager.RequestAccessAsync();

            var geofenceTaskBuilder = new BackgroundTaskBuilder
            {
                Name = "My Home Geofence",
                TaskEntryPoint = "GeofenceTask.BackgroundGeofenceTask"
            };

            var trigger = new LocationTrigger(LocationTriggerType.Geofence);
            geofenceTaskBuilder.SetTrigger(trigger);

            var geofenceTask = geofenceTaskBuilder.Register();
            geofenceTask.Completed += GeofenceTask_Completed;

            switch (backgroundAccessStatus)
            {
                case BackgroundAccessStatus.Unspecified:
                case BackgroundAccessStatus.Denied:
                    ShowMessage("This application is denied of the background task ");
                    break;
            }

        }

Let’s see what we have in here now. The very first one is get the BackgroundAccessStatus. That helps us to know whether our application is capable of accessing BackgroundTasks. Now, let’s move up and use BackgroundTaskBuilder to create the background task we intend to create. Now, if you look at the TaskEntryPoint we provided there, you’d now realize why we created our Background Task project before and added it to the manifest. Because we are using the same entry point name here. I put a name to identify the background task. This is needed as if there is another background task with the same name you would be thrown an exception. If you want to know whether there is another BackgroundTask with the same name you can iterate through BackgroundTaskRegistration.AllTasks and then make sure whether there is one with the same name or not. You can use a method like the following to do so:

        public static bool IsTaskRegistered(string TaskName)
        {
            var Registered = false;
            var entry = BackgroundTaskRegistration.AllTasks.FirstOrDefault(keyval => keyval.Value.Name == TaskName);

            if (entry.Value != null)
                Registered = true;

            return Registered;
        }

I haven’t used that in this solution but feel free to definitely use this. You can even unregister to make sure that your Background Task is unregistered to open up places for others

        public static void Unregister(string TaskName)
        {
            var entry = BackgroundTaskRegistration.AllTasks.FirstOrDefault(keyval => keyval.Value.Name == TaskName);

            if (entry.Value != null)
                entry.Value.Unregister(true);
        }

The next thing that comes off is defining the LocationTrigger for the BackgroundTaskBuilder object. So, we defined a new LocationTrigger of type LocationTriggerType.Geofence and used SetTrigger method to set it up. Then we used BackgroundTaskBuilder object to register the task and we instantiated a GeofenceTask_Completed event handler for that too.

At the bottom you’d see a switch with backgroundAccessStatus and putting a MessageDialog when it’s denied or unspecified.

Handle Geofence Notifications from Background Task:

So, lets move to our Windows Runtime Component which actually is the Background Task project and implement the IBackgroundTask interface. A method named

public void Run(IBackgroundTaskInstance taskInstance)

would pop up, we’d put our regular geofence event handling in there like there in the Foreground example. Now it looks like following when we are handling it from background

    public sealed class BackgroundGeofenceTask : IBackgroundTask
    {
        public void Run(IBackgroundTaskInstance taskInstance)
        {
            var Reports = GeofenceMonitor.Current.ReadReports();
            var SelectedReport =
                Reports.FirstOrDefault(report => (report.Geofence.Id == "My Home Geofence") && (report.NewState == GeofenceState.Entered || report.NewState == GeofenceState.Exited));

            if (SelectedReport==null)
            {
                return;
            }

            //We are creating a toast this time as this is running in Background
            var ToastContent = ToastNotificationManager.GetTemplateContent(ToastTemplateType.ToastText02);

            var TextNodes = ToastContent.GetElementsByTagName("text");

            if (SelectedReport.NewState == GeofenceState.Entered)
            {
                TextNodes[0].AppendChild(ToastContent.CreateTextNode("You are pretty close to your room"));
                TextNodes[1].AppendChild(ToastContent.CreateTextNode(SelectedReport.Geofence.Id));
            }
            else if(SelectedReport.NewState == GeofenceState.Exited)
            {
                TextNodes[0].AppendChild(ToastContent.CreateTextNode("You are pretty close to your room"));
                TextNodes[1].AppendChild(ToastContent.CreateTextNode(SelectedReport.Geofence.Id));
            }

            var settings = ApplicationData.Current.LocalSettings;

            if (settings.Values.ContainsKey("Status"))
            {
                settings.Values["Status"] = SelectedReport.NewState;
            }
            else
            {
                settings.Values.Add(new KeyValuePair<string, object>("Status", SelectedReport.NewState.ToString()));
            }

            var Toast = new ToastNotification(ToastContent);
            var ToastNotifier = ToastNotificationManager.CreateToastNotifier();
            ToastNotifier.Show(Toast);

        }
    }

Now, this looks a wee bit different from the first example. The first change that is noticable is that we are now selecting the reports based on our geofence id and the report’s new state. As we are in background now, we are using our geofence id to get the proper geofence from the whole list. And as now we are in background we are using a Toast Notification instead of a MessageDialog to show our notification.

Handling it from the App Side:

Now you guys might get confused what to do with the foreground code we made earlier. Do we need Current_GeofenceStateChanged event handler anymore. Now here we might have to be a bit careful. Now if we want our app to react different when it is on foreground and make some UI changes it needed then we have to use GeofenceTask_Completed event rather than Current_GeofenceStateChanged. And there’s another thing to be added. We get our GeofenceMonitor Reports using  GeofenceMonitor.Current.ReadReports() and this step can only be done once for every change. So if your background reads it first then, your foreground app would not be able to read it. So, we have to save it somewhere when the background reads it so our foreground app can read it from there.

So we are using ApplicationData.Current.LocalSettings to save our state in the Background Task. If you look closely you’d find the following snippet:


            var settings = ApplicationData.Current.LocalSettings;

            if (settings.Values.ContainsKey("Status"))
            {
                settings.Values["Status"] = SelectedReport.NewState;
            }
            else
            {
                settings.Values.Add(new KeyValuePair<string, object>("Status", SelectedReport.NewState.ToString()));
            }

So, in our app side GeofenceTask_Completed event handler we’d read the status and fill up a new textblock.

Thus we added a new set of textblocks in the MainPage.xaml


<TextBlock Grid.Row="2" Text="Status" FontSize="25"/>
<TextBlock Grid.Row="2" Grid.Column="1" Name="Status"  FontSize="25"/>

Now, our GeofenceTask_Completed event handler looks like the following:

        private async void GeofenceTask_Completed(BackgroundTaskRegistration sender, BackgroundTaskCompletedEventArgs args)
        {
            if (sender != null)
            {
                // Update the UI with progress reported by the background task
                await Dispatcher.RunAsync(CoreDispatcherPriority.Normal, () =>
                {
                    try
                    {
                        // If the background task threw an exception, display the exception
                        args.CheckResult();

                        var settings = ApplicationData.Current.LocalSettings;

                        // get status
                        if (settings.Values.ContainsKey("Status"))
                        {
                            Status.Text = settings.Values["Status"].ToString();
                        }

                    }
                    catch (Exception ex)
                    {
                        ShowMessage(ex.Message);
                    }
                });
            }

        }

Now, if you look closely you will see all we did here is get the “Status” object from our ApplicationData.Current.LocalSettings and posted it on the TextBlock named Status. 🙂

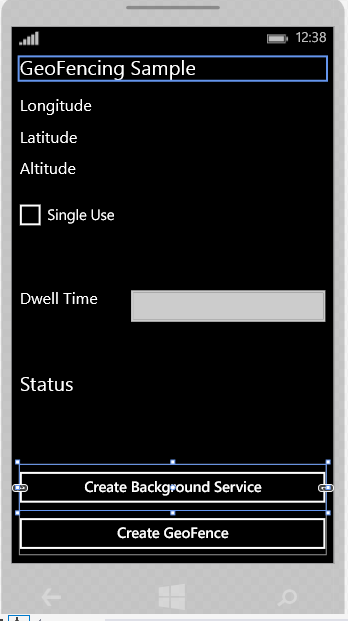
Now, all we have left to do is do a little change in UI and add an extra button to set up the Geofence background task. Now it looks like the following:

GeoFencing - 8

I created the method stub for the new buttons click event too and it looks like the following:

        private async void CreateBackgroundServiceButton_Click(object sender, RoutedEventArgs e)
        {
            if (IsTaskRegistered("My Home Geofence"))
            {
                Unregister("My Home Geofence");
            }
            await RegisterBackgroundTask();
        }

Testing the App on the Emulator:

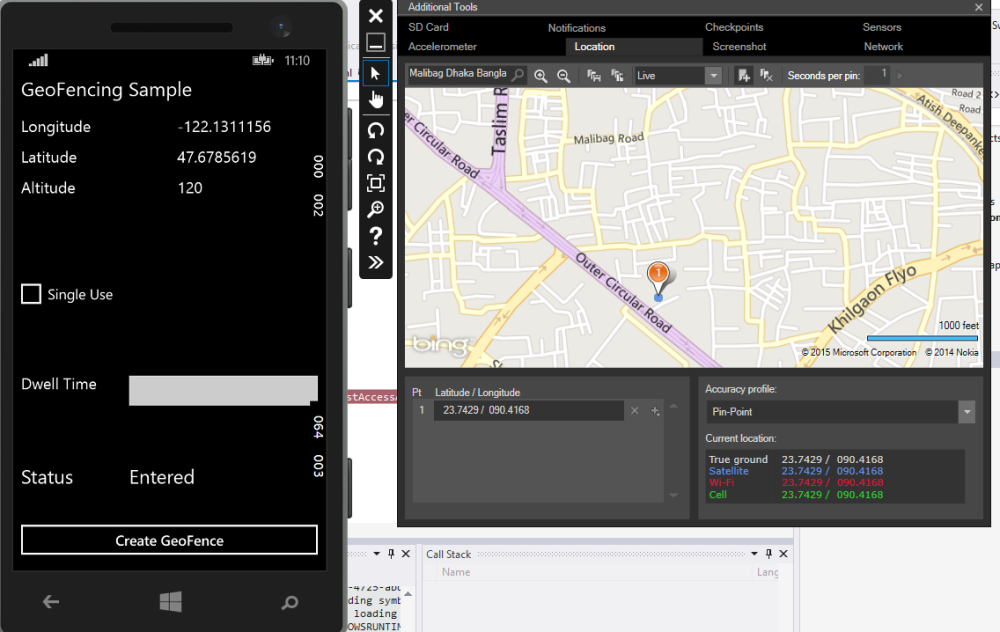
You can definitely test the app on the emulator. Like always click the debug button with a emulator selected as the device and when it opens go to additional tools button and open up the location tab. Select a close location to your geofence, I did select a close one to my room and the status changed itself to “Entered”. It was that easy! You can even try the foreground example in the same way!

GeoFencing - 7

The source code is here.

Stay frosty! Hope this would help.

Windows Phones For Newbies – Tracking location in Windows Phone 8.1

Windows Phone 8.1 comes with a lot of prospects in the geo location end and usually the next thing after detecting your very own location, people tends to look for one another thing and that is tracking the location as it should update itself. So, if you’re wondering about how you should instantiate a map and track your location, you really should check out my previous post .

And if you have already done that (I hope you liked it). Then you’d probably know how to do the following:

  1. Please go ahead to your visual studio (Im using a Visual Studio 2013 Community Edition)  and open a new project on Blank App on Windows Phone 8.1
  2. Go over your project properties and go over Capabilities. Enable Location for your app (If you are from Windows Phone 8, you’d be pretty amazed that you don’t see ID_CAP_MAP anymore.


A Basic UI:

Let’s set up a basic UI and yes It’s kind of a rip off from MSDN but as long as it helps people, it’s cool. Our little UI has two Buttons and a number of textblocks and it looks like below in XAML (I’m only posting the main grid):


<Grid Background="{ThemeResource ApplicationPageBackgroundThemeBrush}">
<Grid.RowDefinitions>
<RowDefinition></RowDefinition>
</Grid.RowDefinitions>

<Grid>
<TextBlock Text="Location Tracker" Margin=" 15" FontSize="45"></TextBlock>
</Grid>

<Grid Grid.Row="1">
<Grid.ColumnDefinitions>
<ColumnDefinition></ColumnDefinition>
</Grid.ColumnDefinitions>
<Button Grid.Column="0" Content="Track Location" Click="TrackLocationButton_Click"
HorizontalAlignment="Center" x:Name="TrackLocationButton"
VerticalAlignment="Bottom" />

<Button IsEnabled="False" Grid.Column="1" Content="Stop Tracking" Click="StoptrackingButton_Click"
HorizontalAlignment="Center"  x:Name="StoptrackingButton"
VerticalAlignment="Bottom" />
</Grid>

<Grid Grid.Row="2">
<Grid.ColumnDefinitions>
<ColumnDefinition Width="3.5*"></ColumnDefinition>
<ColumnDefinition Width="7*"></ColumnDefinition>
</Grid.ColumnDefinitions>
<StackPanel Margin="10">
<TextBlock Text="Latitude"  FontSize="23" />
<TextBlock  Text="Longitude"  FontSize="23" />
<TextBlock  Text="Accuracy"  FontSize="23" />
</StackPanel>
<StackPanel Margin="10" Grid.Column="1">
<TextBlock  Name="LatitudeText" FontSize="23" />
<TextBlock   Name="LongitudeText" FontSize="23" />
<TextBlock   Name="AccuracyText" FontSize="23" />
</StackPanel>
</Grid>

</Grid>

If that seems a bit too much xaml for you then calm down because It looks extremely basic too:

Tracking - 1

Now, let’s move towards the MainPage.xaml.cs part. As the previous article suggests, the first thing you need is definitely a Geolocator . So please go ahead and define a Geolocator instance.


private Geolocator locator = null;

Now that we have a geo locator we can move ahead and go over the Properties of TrackLocationButton and create the method stub for Click event. And the event handler looks like below:


private void TrackLocationButton_Click(object sender, RoutedEventArgs e)
        {
            if (locator == null)
            {
                locator = new Geolocator();
            }
            if (locator != null)
            {
                locator.MovementThreshold = 3;

                locator.PositionChanged +=
                    new TypedEventHandler<Geolocator,
                        PositionChangedEventArgs>(locator_PositionChanged);

                
            }

            TrackLocationButton.IsEnabled = false;
            StoptrackingButton.IsEnabled = true;

        }

Now, if you dive a little bit into that, you will see that if the locator is instantiated then the first property we do change is the MovementThreshold property. It is the property that defines the movement threshold for the geo tracking to notify you. It’s defined in meters and thus we have defined it to 3 meters. Now next question that comes along is how would I know that I have moved my MovementThreshold amount of distance. The common answer would be actually invoking a PositionChanged event and attach a handler to it. And the handler locator_PositionChanged looks like below:


async private void locator_PositionChanged(Geolocator sender, PositionChangedEventArgs e)
{
await dispatcher.RunAsync(CoreDispatcherPriority.Normal, () =>
{
Geoposition geoPosition = e.Position;
LatitudeText.Text = geoPosition.Coordinate.Point.Position.Latitude.ToString();
LongitudeText.Text = geoPosition.Coordinate.Point.Position.Longitude.ToString();
AccuracyText.Text = geoPosition.Coordinate.Accuracy.ToString();
});
}

Now even before describing whats being done here you might wonder where the dispatcher comes from, truth is it has been declared before as:


private Geolocator locator = null;
private CoreDispatcher dispatcher;

public MainPage()
{
this.InitializeComponent();
dispatcher = Window.Current.CoreWindow.Dispatcher;
}

The reason we are using that would be pretty clear if we look at what are we doing. We are constantly updating our LatitudeText, LongitudeText, AccuracyText and as we are accessing a UI thread frequently from a event handler, we do need to make it sure it doesn’t block the regular UI interactions. Thus we used a CoreDispatcher here, much like it was in Windows Phone 8 as Dispatcher. You’d also be able to notice that the event handler is async and thus dispatcher.RunAsync invocation was awaited. We used CoreDispatcherPriority.Normal and you can even try a higher priority if you like. All this event handler is doing is it is actually updating the UI and the textblocks.

Now all you need is a StoptrackingButton to get things to stop and all you have to do is unhook the locator_PositionChanged event handler.


private void StoptrackingButton_Click(object sender, RoutedEventArgs e)
{
if (locator != null)
{
locator.PositionChanged -= new TypedEventHandler<Geolocator, PositionChangedEventArgs>(locator_PositionChanged);
}

StoptrackingButton.IsEnabled = false;
TrackLocationButton.IsEnabled = true;
}

Debugging it on the emulator:

As this sample has geolocator usage, this is always better to be tested in a device but you can definitely try it on an emulator too. To test it load the app on the emulator first by invoking build.

Tracking - 2

When the emulator hooks up open up the emulator tools and go to the location tab and click on the map to give you a primary location first. You can have a look at the gif below for an idea

Tracking - 3

Now after you pointed a primary location in the map. Now you can try clicking the track location button. After you do that Latitude, Longitude and Accuracy would pop up for the place you clicked on the map. Now click some more around it. And you will see the data changes on the textblocks.  You can do one thing more too. You can change the interaction mode from Live to Pin and play all the pins. That would even allow to emulate place changes in your emulator.  The following gif would definitely help you.

Tracking - 4

And the code sample is here.

Stay Frosty!


Different Operators in C#

In this article we will discuss about common operators that used in C#. Like any other programming languages C# has also some common operators. We can divide those as the following –
• Assignment Operator (=)
• Arithmetic Operators (+,-,*,/,%)
• Comparison Operators (==,!=,>,>=,<,<=)
• Conditional Operators (&&,||)
• Ternary Operator (?:)
• Null Coalescing Operator (??)
Now we will discuss about each of this operator in details.

Assignment Operator (=)

This is a very common operator in every programming language. It is used to assign a value in a variable. We can give a variable a value by this operator. Suppose we declare a variable by the following instruction-

Int variable_name;

Then this variable reserve some memory in RAM but no value is saved in those memory. We can assign value to those memory by using assignment operator as follows-

Int variable_name=5;

Now the value 5 is reserved in those memory blocks. So assignment operator is used to assign values.

Arithmetic Operators (+,-,*,/,%)

These operators are used to perform arithmetic operation. In many places of a program we need to perform many arithmetic operation. So it is important to understand these operators closely.
The “+” operator performs addition operation. Suppose we want to add two values. Then we can do that by the following-

Int a = 5+4;
Or,
Int a=5;
Int b=6;
Int result= a+b;

The “+” operator takes two operands and return the result of addition between those operands. Similarly “-” operator performs the subtraction operation between two operands. It will subtract its right side operand from left side operand and return the result. The multiplication operator is “*”. It will perform multiplication operation.
Now the two operator / and % is related to division operation. The forward slash (/) operator returns the quotient of the division operation and “%” (read as MOD) operator returns the reminder. To understand the difference we consider a division operation. Suppose we want to divide 10 by 2. So here the Quotient will be 5 and reminder will be 0. If we use / operator then it will return 5 and if we use % then it will return 0. Consider the following program-

using System;
class Program
{
   static void Main()
    {
        int Numerator = 10;
        int Denominator = 2;

        int result = Numerator / Denominator;

        Console.WriteLine("{0}", result);
    }
}

The above program will print 5 because here we use / operator and it will return quotient. If we used % in place of / then it will print the reminder that is 0 here.

Comparison Operators (==,!=,>,>=,<,<=)

Comparison operators are used to compare to value and always return true or false. Every comparison operator has a meaning and performs a specific compare operation. The best example of this operator is in conditional statement. The statement in which we compare something in respect with some condition is called conditional statement. There are some keywords that used in conditional statement, one of this is “if” keyword. It is very common in almost all programming languages.
The double equal sign is used to compare equality. Consider the following example-

using System;
class Program
{
   static void Main()
    {
        int a = 10;
       if(a==10)
       {
           Console.WriteLine("{0}", a);
       }
        
    }
} 

In the above example we compare the value of variable with 10. If the value of variable a is equal to 10 then the next instruction will execute. The next instruction is to print the value of ‘a’ that is 10 here. So the program will print 10.
The “!=” operator is used to check inequality. For example in the above example we can check the variable ‘a’ is not equal or not. If we want to execute another instruction if the variable is not equal to 10 then code should be as follows-

using System;
class Program
{
   static void Main()
    {
        int a = 5;
       if(a==10)
       {
           Console.WriteLine("{0}", a);
       }
       if(a!=10)
       {
           Console.WriteLine("a is not equal to 10");
       }
    }
}

The above program will print “a is not equal to 10” because the value of a is 5 here. The != operator used here to execute the meaningful string that user can understand specifically that a is not equal to 10.
Similarly we can check greater than relation by the “>” operator. It will return true if the right side operand is greater than the left side operand. If we want to check greater or equal relation then we can use >= operator. It will return true if the left side operand is greater than right side operand and also if the operands are equal to each other.
Like greater than relation we can check less than relation by “<” operator and less than or equal relation by “<=” operator.

Conditional Operators (&&,||)

There are two operators that used in conditional statements named as AND (&&) and OR (||). If there is any situation where we need to execute a statement if and only if some of conditions are true then we can use && operator. This operator takes two condition and execute next instructions if all of those conditions are true. Suppose we have to check if a number is less than 5 and greater than 1 or not then we can check it by && operator as following-

using System;
class Program
{
   static void Main()
    {
        int a=2;
        
       if(a1 )
       {
           Console.WriteLine("a is less than 5 and greater than 1");
       }
        
    }
}

In the above example two conditions is checked, one is a is less than 5 and the other is a is greater than 1. So the print instruction will be executed if each of these instruction are true. Another operator is || (OR) this operator used as the same of && operator but if any one of the condition is true between two then the next instruction will execute. The OR operator return true if any one of the condition is true. In the above example if we used OR operator then weather the value of a is less than 5 or greater than 1 the print instruction will execute.

 
using System;
class Program
{
   static void Main()
    {
        int a=10;
        
       if(a1 )
       {
           Console.WriteLine("a is less than 5 OR greater than 1");
       }
        
    }
}

In the above example the condition a is less than 5 is false but a is greater than 1 true, so one of the condition is true. That’s why the print instruction will execute.

Ternary Operator (?:)

The ternary operator is a very interesting operator. It gives us two options if any condition is true than do something otherwise do something. The syntax of ternary operator can be written as follows-
Any Condition ? do if the condition is true : do if condition is false
We can see it by the following code-

using System;
class Program
{
   static void Main()
    {
        int a=10;
        bool ISValue10 = a == 10 ? true : false;

        Console.WriteLine("{0}", ISValue10);
        
    }
}

In the above example the condition is if the variable “a” is equal to 10 or not. If it is true then the bool type variable “ISValue10” will be assigned by true otherwise false. Here the example will print true because here the value of variable is 10. We can do the same by if statement but it will take more instruction that we have done here with one instruction. That is the benefit of using ternary operator.

Null Coalescing Operator (??)

To understand null coalescing operator first we have to understand nullable types in C#. Actually we can divide the types in C# in two broad categories-
• Value types
• Reference types
In the previous article we have already seen the value types and those are- integer, double, float, decimal etc. We have also seen a reference type that is string type. String is actually a class. We will discuss about reference types and value types in details in the later session. What we need to understand at this point is types in C# can be divided in two broad categories that is value type and reference type. Example of value type is integer, float, double, structs, enums and example of reference type is interface, delegates, arrays, class etc. And another point we need to keep in mind at this point is the default value of a reference type is null and the default value for value type is some form of zero. For example the default value of type integer is zero and it cannot hold the value null. To assign null in a variable we use the keyword null in C#. If we try to assign null to a integer type variable then we will get an error. So value type cannot hold null value. But as I told before that string is a class that is reference type so we can assign a string variable with null. For an example we can write-

 
string s = null;

but we cannot write-

int a = null; 

If we try to assign null to a integer type variable then it will return an immediate error. Sometimes it is necessary to assign a value types variable with the value null. Generally it is necessary if we use C# to communicate with a database. Since nullable types and non-nullable types is not a concept of database it is a concept of C#, any of the field in a database can be null. Sometimes for making decision it is necessary to assign null to value type variable. Again we get here two types, one is nullable and the other is non-nullable. We can assign null to non-nullable types by using the ? operator.
Suppose we have a form that ask the user a question “Are you a teacher?” and this field is optional. User can say yes or no and the user can also keep the field empty. If we have a bool type variable to store the answer then we can assign true or false in this variable nothing else. But if the user keep the field empty we need to assign null to bool type variable. We can do it by using ? operator as follows.

bool? ISUserTeacher = null;

So we can make a non-nullable type a nullable type by using ? operator. Now consider an example to understand null coalescing operator. Suppose a have 10 mangoes in a tree and we store the result in a integer type variable as follows-

int MangoesInTree = 10; 

Now it is possible that there is no mangoes in the tree. So we have to make the integer variable a nullable variable that we can assign null value to it. We can do it as follows-

int? MangoesInTree = null; 

Suppose we have another variable named availablemangoes and we will assign the value of MangoesInTree in it if MangoesInTree is not null. If MangoesInTree is null then we will assign 0 to availablemangoes variable. We can do it as follows-

using System;
class Program
{
   static void Main()
    {
        int? MangoesInTree = null;

        int availablemangoes;

       if(MangoesInTree==null)
       {
           availablemangoes = 0;
       }
       else
       {
           availablemangoes = MangoesInTree;
       }
	Console.WriteLine(“{0}”,availablemangoes);
    }
}

Unfortunately we will get an error here that “cannot imlicitly convert type int? to int”. Here MangoesInTree variable is a nullable variable but availablemangoes is not a nullable variable so it cannot be assigned by the nullable types. Here we can use a way to do it. It is called type casting. We will discuss about type casting and implicit, explicit type conversion in the very next article. So just for now note it, we can do the above program as follows-

using System;
class Program
{
   static void Main()
    {
        int? MangoesInTree = null;

        int availablemangoes;

       if(MangoesInTree==null)
       {
           availablemangoes = 0;
       }
       else
       {
           availablemangoes = (int)MangoesInTree;
       }
Console.WriteLine(“{0}”,availablemangoes);

    }
} 

Now it will print the value of availablemangoes as we wanted. But we can do the same program with just one line and this is what the null coalescing operator is. We can do the same program with null coalescing operator. The above program with null coalescing operator can be written as follows-

using System;
class Program
{
   static void Main()
    {
        int? MangoesInTree = 10;

        int availablemangoes;

        availablemangoes = MangoesInTree ?? 0;

       Console.WriteLine("{0}", availablemangoes);
    }
}

Look closely to the above program here we do the same thing with just one line of code. Here the default value what we want to assign in non-nullable variable is given after the null coalescing operator (??) and before the operator we supply the value that we want to assign if the MangoesInTree variable is not null that is the variable itself. That is the purpose of null coalescing operator. It helps to assign a non-nullable types with nullable types in C#.

Windows Phone 8.1 for Newbies – The complete reference of Map Control in Windows Phone 8.1 WinRT

As Windows Phone came up with Windows Phone 8.1 update last year it came up with 2 different platforms to work on , silverlight and WinRT, thus making it a bit tough to keep up with the latest api documentation and maps are not different.

As I have written before how to use Maps following MVVM on Windows Phone 8, I’m going to keep today’s one as a bit of a reference to that and will just post segments that you can use as a code sample.

Instantiating a Map in Windows Phone 8.1:

Quiet frankly this is the easiest job here to do actually. Let’s go ahead and start taking things on screenshot. First we need to open a new project targeting Windows Phone 8.1 and name it MapTest. Then I went to my Toolbox and dragged a MapControl in the middle of the Main Grid. I have already changed my map controls HorizontalAlignment and VerticalAlignment to “stretch’ thus allowing the MapControl to be stretched out to the fullest for the whole app.


<Maps:MapControl HorizontalAlignment="Stretch"  VerticalAlignment="Stretch"/>

Usually a map driven app needs an AuthenticationToken to authenticate the map services but we will focus on it later. Let’s go ahead to solution explorer and open Package.appxmanifest and go to Capabilities tab and make sure Location and Internet both of the checkboxes are checked just to make it sure that your app is map capable.

Map -1

Now we have a green light to use Maps. If you are  a fella from Windows Phone 8 development you’ll see now, you don’t have ID_CAP_MAP here to make an app enable to use maps. You only need it to have location capability.

Getting Your Own Location:

Getting your own location is still as straightforward as it was before in Windows Phone 8 era. All you have to do is use the same Geolocator class and it looks like the following:

Geolocator locator = new Geolocator();
Geoposition position = await locator.GetGeopositionAsync();

Now the question remains now is how would you be able to show it on a Map. Now, Windows Phone 8.1 gives you a lot of  options to choose from actually here. You can use three specific things here:

  1. MapIcon
  2. XAML controls
  3. Shapes

Using MapIcon:

The first trial we are going to make is using the MapIcon as it is most straight forward. MapIcon is essentially derived from MapElement class, it can be configured by providing a new image to it or it provides a default one. And the declaration is pretty straight forward too.


MapIcon icon = new MapIcon();
icon.Location = position.Coordinate.Point;
icon.Title = "My Location";
MyMap.MapElements.Add(icon);

Now, if you want to provide a specific Image as your MapIcon, include the image in the Assets folder and let’s assume the image name is MapIcon.png. All you have to do is change the Image property of your MapIcon object.

icon.Image = RandomAccessStreamReference.CreateFromUri(new Uri("ms-appx:///Assets/MapIcon.png"));

What people actually misinterpret here is usually they compare PushPin with MapIcon and they do have a valid reason to do so because you can achieve the same result by using both of them but in actuality it doesn’t work like so. MapIcons are actually a set of Icons that define different purposes on the map. These are lightweight, so please chose one if you want to use these to show a specific purpose. Now our purpose was to show our current location.

Now let’s put together a method named GetMyLocation() and put all these together and see what happens.


private async void GetMyLocation()
        {
            Geolocator locator = new Geolocator();
            Geoposition position = await locator.GetGeopositionAsync();

            MapIcon icon = new MapIcon();
            icon.Location = position.Coordinate.Point;
            icon.Title = "My Location";
            icon.Image = RandomAccessStreamReference.CreateFromUri(new Uri("ms-appx:///Assets/ImageIcon.png"));
            MyMap.MapElements.Add(icon);

            MyMap.Center = position.Coordinate.Point;
            MyMap.DesiredPitch = 0;

            await MyMap.TrySetViewAsync(position.Coordinate.Point, 15);
           
        }

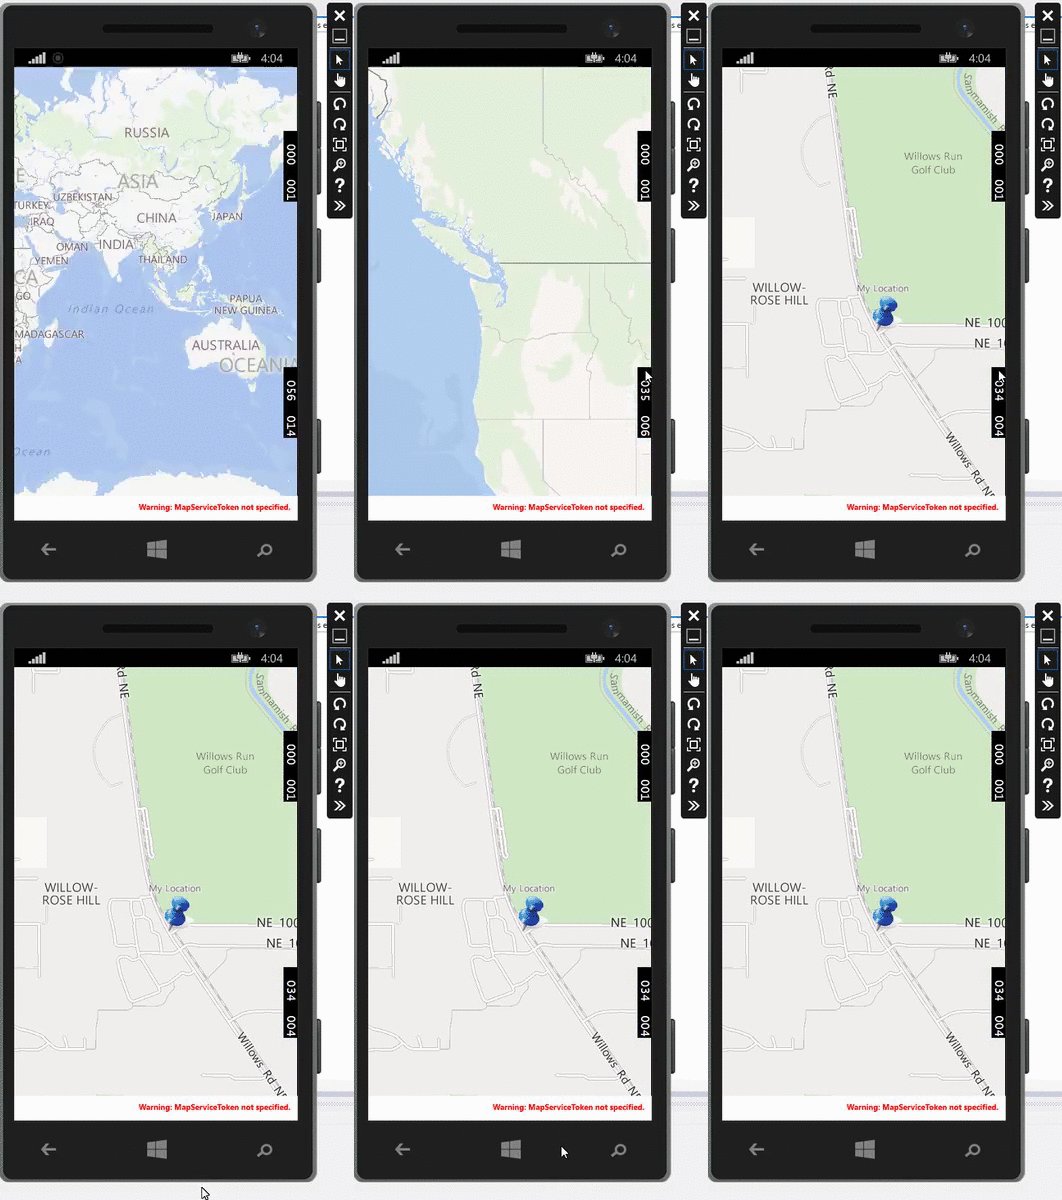
Now, as this goes, you’ll see Ive done some more works too. I’ve changed the center property of the map control because after adding the MapIcon you need your map to focus on that point and this is how you change the center of your map. And the next thing I did is setting DesiredPitch to 0. We will see more on this property later. You definitely have noticed by now that the method is an asynchronous method because the process of locating your position is asynchronous and we’re using our favourite await keyword to make locator.GetGeopositionAsync() to work synchronously inside the method. The last thing you want is to focus to the selected location (My Location) on the map. So Im setting the map view in an async manner using  MyMap.TrySetViewAsync function and it takes two parameters, the first one being the point (the geolocation of you) you want to set your view into and the second is a zoom level of the map. It is actually setting the MyMap.ZoomLevel property that ranges from 1 – 20. Higher number means you’re more zoomed thus more closer to the ground. I’ve also used a custom MapIcon.png with a size of 65×65 pixels. Please be careful on this one as the size you chose is the size you get on the Map. Please choose a size that looks good for your purpose. Now lets put the GetMyLocation() method OnNavigatedTo method and thus you get a smooth zooming animation.

Map -2

Now, couple of things that are missing here is a progress bar showing that the location is being detected and a try catch that detects any exception detecting the location. Plus we need to put our location detection invocation in a button so we can tap it anytime to load our current location anytime. For that we are going to take help of Application Bar.

Now Let’s add an app bar in the bottom like below:


<Page.BottomAppBar>
<CommandBar ClosedDisplayMode="Minimal" Opacity="0.7">
<AppBarButton Label="Find Me!" Icon="Target" />
</CommandBar>
</Page.BottomAppBar>

Now on the AppBarButton_Tapped event handler put GetMyLocation call. It would possibly look like the following:


private void AppBarButton_Tapped(object sender, TappedRoutedEventArgs e)
{
GetMyLocation();

}

Now, let’ wrap up the location detection process under a try-catch just to make sure that if anything goes wrong, you’re covered. And as we’d need to show progress please put the following method in MainPage.xaml too.


private async void ToggleProgressBar( bool toggle, string message="")
{
StatusBarProgressIndicator progressbar = StatusBar.GetForCurrentView().ProgressIndicator;
if(toggle)
{
progressbar.Text = message;
await progressbar.ShowAsync();
}
else
{
await progressbar.HideAsync();
}

}

Now all you have to do is call it to show ProgressIndicator in StatusBar, you can even provide the message in the method call.

Now GetMyLocation would look like the following:

private async void GetMyLocation()
        {
            ToggleProgressBar(true,"Getting your location...");

            try
            {
                Geolocator locator = new Geolocator();
                Geoposition position = await locator.GetGeopositionAsync();

                MapIcon icon = new MapIcon();
                icon.Location = position.Coordinate.Point;
                icon.Title = "My Location";
                icon.Image = RandomAccessStreamReference.CreateFromUri(new Uri("ms-appx:///Assets/ImageIcon.png"));
                MyMap.MapElements.Add(icon);

                MyMap.Center = position.Coordinate.Point;
                MyMap.DesiredPitch = 0;

                await MyMap.TrySetViewAsync(position.Coordinate.Point, 15);
            }
            catch (Exception ex)
            {
                MessageDialog ErrorDialog = new MessageDialog(ex.Message);
                ErrorDialog.ShowAsync();
            }

            ToggleProgressBar(false);
        }

Using XAML Controls/Shapes on Map:

Using XAML controls over Map is something I really love because I was pretty fond of the PushPin control provided in Windows Phone Toolkit for Windows Phone 8. Usually this approach is more suitable for MVVM approached apps though. And as per this tutorial goes, we’d not got over MVVM just yet (We will cover that too). So, let’s see how you add XAML controls or shapes in a map from codebehind.

Instead of using MapIcon all you have to do know is generate a XAML control/Shape in background and add it on the children list of the map control rather than the MapElements list.

So, just take off the MapIcon Segment and use this instead:


private async void GetMyLocation()
        {
            ToggleProgressBar(true,"Loading");

            try
            {
                Geolocator locator = new Geolocator();
                Geoposition position = await locator.GetGeopositionAsync();

                var pushpin = new Windows.UI.Xaml.Shapes.Ellipse();
                pushpin.Fill=new SolidColorBrush(Colors.Red);
                pushpin.Height=50;
                pushpin.Width=50;

                MyMap.Children.Add(pushpin);
     
                MyMap.DesiredPitch = 0;

                MapControl.SetLocation(pushpin,position.Coordinate.Point);
                MapControl.SetNormalizedAnchorPoint(pushpin, new Point(0.5, 0.5));

                await MyMap.TrySetViewAsync(position.Coordinate.Point, 15,0,0,MapAnimationKind.Bow);
            }
            catch (Exception ex)
            {
                MessageDialog ErrorDialog = new MessageDialog(ex.Message);
                ErrorDialog.ShowAsync();
            }

            ToggleProgressBar(false);
 
        }

Now, before moving to the next topic,  I’d like to address some points in this approach.

  1. You can create your control in codebehind as you want to build it, you can use possibly any XAML control starting from containers like Grid and StackPanels to Shapes like rectangle and Ellipse.
  2. Select a proper size of the shape if you want to use it and it’s better than MapIcons in one sense is that MapIcons are not guaranteed to be viewed.
  3. MapIcon objects are usually added in the MapElements list but this is added in the Map Children collection.
  4. You can define your datatemplate behind and even hook events (We will see this on MVVM approach

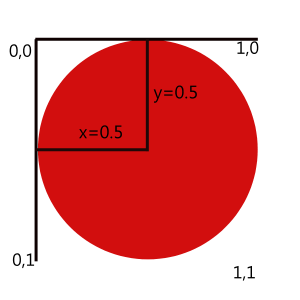
You have to select a proper anchor point for your Xaml/Shape pushpin too. It’s actually nothing but a point object in a 2d space. I want my anchor point to be in the center of the sphere. So if I put my sphere in a 2d space and 1 is the max limit in both X and Y axis, you’d find out that (0.5, 0.5) is the center of the sphere. But this 2d co-ordinate system is actually a tad different. Kindly allow me to demonstrate in the following picture:

Map -4

So, according to this rule, now you can set your anchor point properly according to your xaml control. Just put it on an imaginary 2d grid and find your desired point. left bottom would be (0,1) and right bottom would be (1,1).

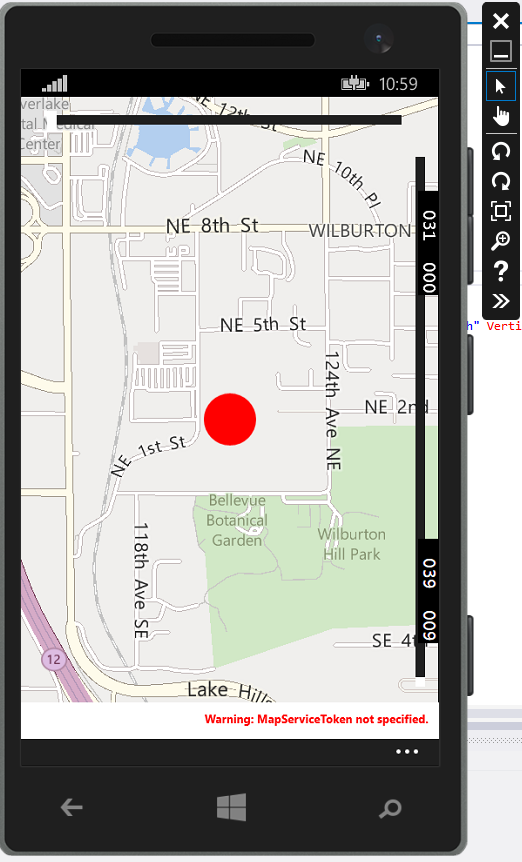
If you look closely you will also see we have changed our TrySetViewAsync invocation with some more parameters. Those are heading, pitch (We kept both of them at 0) and the last one is MapAnimationKind that allows you to define what kind of animation you want when setting the view. I personally love the Bow one thus I used that one and it looks like below:

Map -3

Changing The Map Properties:

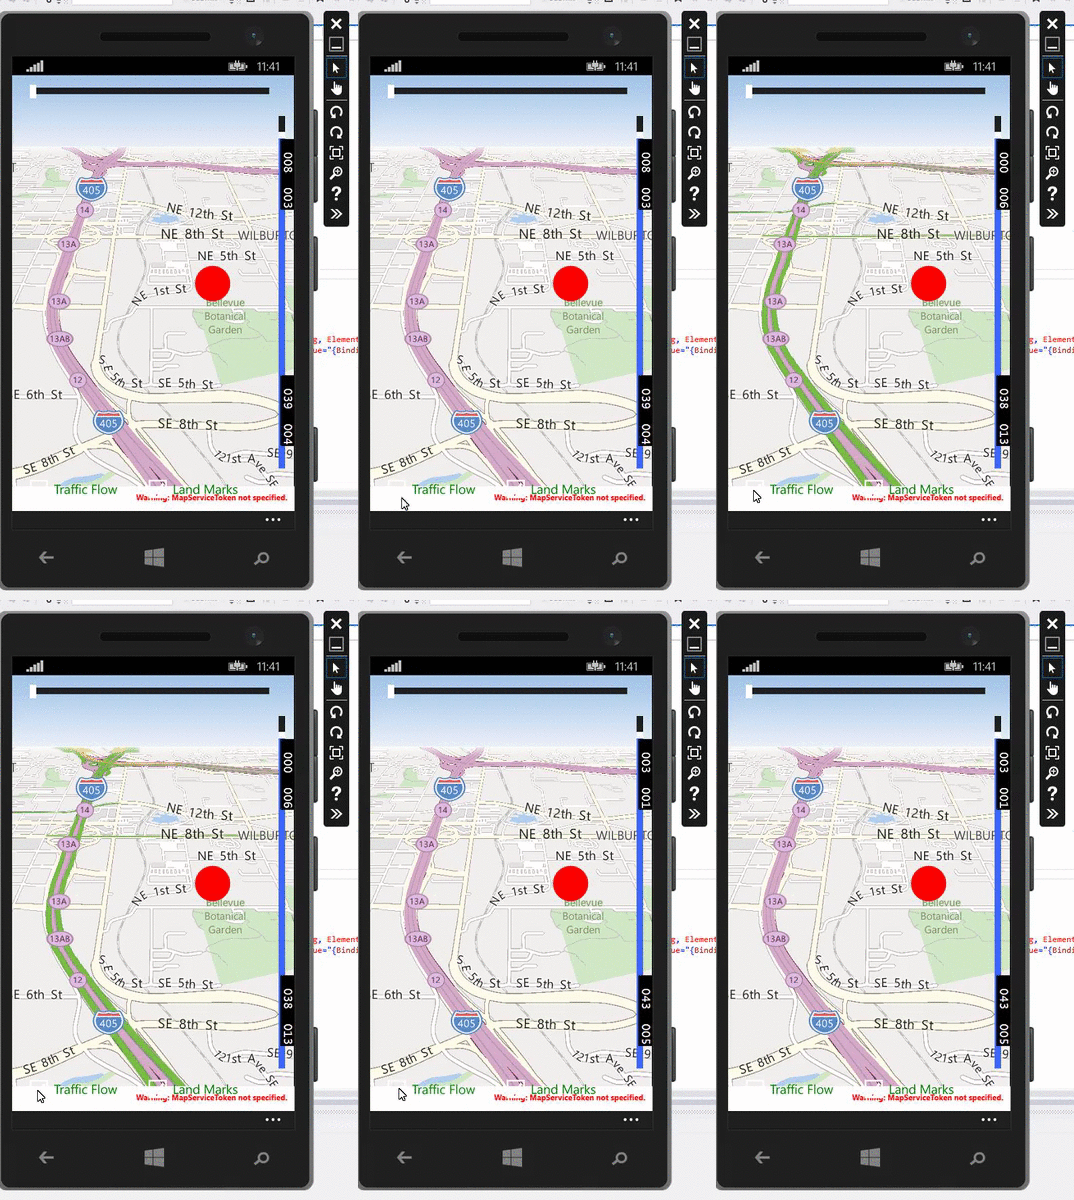
The map control itself comes with a lot of properties equipped, let’s see how we can change these for a chance. The first two things we’d love to change is the pitch/tilt and the rotation/heading. For that we’d need to change our layout a bit. Let’s keep the map in the background and put 2 sliders (one horizontal and one vertical) for changing rotation and pitch of the map.

We have introduced 3 rows and columns in the main grid just to keep the whole map in the background and the sliders floating in the top. The horizontal slider would change the Maps rotation and the Vertical Slider would change the Maps pitch. Now the main grid looks like the following:


<Grid>
<Grid.RowDefinitions>
<RowDefinition Height="Auto"></RowDefinition>
<RowDefinition Height="*"></RowDefinition>
<RowDefinition Height="50"></RowDefinition>
</Grid.RowDefinitions>

<Grid.ColumnDefinitions>
<ColumnDefinition Width="25"></ColumnDefinition>
<ColumnDefinition Width="*"></ColumnDefinition>
<ColumnDefinition Width="Auto"></ColumnDefinition>

</Grid.ColumnDefinitions>

<Maps:MapControl Grid.RowSpan="3" Grid.ColumnSpan="3" x:Name="MyMap"  HorizontalAlignment="Stretch" VerticalAlignment="Stretch">

</Maps:MapControl>

<Slider x:Name="RotationSlider" Grid.Row="0" Grid.Column="1" Maximum="360"></Slider>
<Slider x:Name="PitchSlider" Grid.Row="1" Grid.Column="2" Orientation="Vertical" Maximum="65"  ></Slider>
</Grid>

And it looks on the emulator like this:

Map -6

Now the first thing you’d notice here is I’ve named the sliders accordingly. The horizontal one is called RotationSlider and the vertical one is called PitchSlider. Now, usually what we do is invoke the ValueChanged event and change the Heading or the DesiredPitch of the map. But there is a smarter way to do that. You can create two element bindings to the MyMap and bind the value of the sliders to the specific properties. If you watch carefully you will see that I have set the RotationSlider maximum value to 360 as that is the maximum rotation value and PitchSlider Maximum to 65 as that is the maximum tilt the MapControl allows. Now replace your sliders with the following binding:


<Slider x:Name="RotationSlider" Grid.Row="0" Grid.Column="1" Maximum="360" Value="{Binding Heading, ElementName=MyMap, Mode=TwoWay}" ></Slider>
<Slider x:Name="PitchSlider" Grid.Row="1" Grid.Column="2" Orientation="Vertical" Maximum="65" Value="{Binding DesiredPitch, ElementName=MyMap, Mode=TwoWay}" ></Slider>

Please make it sure the Binding Mode is set to TwoWay so when the map updates the sliders updates too.  And without even writing a single backend code the feature is done!

Map -5

So, that’s a creative use of element binding. Now you could’ve done it even from code backend. All you had to do is go to properties of PitchSlider and RotationSlider and create the ValueChanged method stub.  The methods would’ve looked like the following:


private void PitchSlider_ValueChanged(object sender, RangeBaseValueChangedEventArgs e)
{
MyMap.DesiredPitch = PitchSlider.Value;
}

private void RotationSlider_ValueChanged(object sender, RangeBaseValueChangedEventArgs e)
{
MyMap.Heading = RotationSlider.Value;
}

Let’s move on and see some of the other features we’d like to test too. Let’s add two checkboxes in the bottom of the map to enable Traffic Flow and Land Marks. We added a horizontal stackpanel and added two checkboxes along with it.


<StackPanel Grid.Row="2" Grid.Column="1" Orientation="Horizontal">
<CheckBox x:Name="TrafficCheck" Content="Traffic Flow" Foreground="Green"></CheckBox>
<CheckBox x:Name="LandmarksCheck" Content="Land Marks" Foreground="Green"></CheckBox>
</StackPanel>

Now, we can use a bit more creative element binding or use Checked and Unchecked event to change the respective map control properties. Let’s see how we can bind it using element binding again.


<Maps:MapControl TrafficFlowVisible="{Binding IsChecked, ElementName=TrafficCheck, Mode=TwoWay}"
LandmarksVisible="{Binding IsChecked, ElementName=LandmarksCheck, Mode=TwoWay}"
Grid.RowSpan="3" Grid.ColumnSpan="3" x:Name="MyMap"
HorizontalAlignment="Stretch" VerticalAlignment="Stretch">

Now, watch carefully the binding written in TrafficFlowVisible property and LandMarksVisible property. All I did here is binded them with the appropriate checkbox IsChecked property and kept the binding mode two way. So, anytime these properties get changed even from codebehind we’ll see the change on the checkbox and vice versa. Traffic Flow is a cool feature actually. See the next gif to get an idea:

Map -7

Pretty cool huh!

Now you can even write it on the codebehind. You have to go to the properties of any of the checkbox and create the checked and unchecked property stub so you can toggle the maps TrafficFlowVisible feature. From code behind it will look like this:


private void TrafficCheck_Checked(object sender, RoutedEventArgs e)
{
MyMap.TrafficFlowVisible = true;
}

private void TrafficCheck_Unchecked(object sender, RoutedEventArgs e)
{
MyMap.TrafficFlowVisible = false;
}

and from the xaml:


<CheckBox x:Name="TrafficCheck" Content="Traffic Flow" Foreground="Green" Checked="TrafficCheck_Checked" Unchecked="TrafficCheck_Unchecked"></CheckBox>

I still prefer the Element binding because that is extremely easy. There’s one more property named PedestrianFeaturesVisible property. You can try that following the same way here.

Map Appearance:

Map Control is even cool enough to let you select the Map Appearance too! Let’s modify the bottom stackpanel so it can hold more buttons and added a grid with two columns. We added one combobox in each column so we can change map color scheme and map style.

So the bottom stackpanel looks like this now:


<StackPanel Grid.Row="2" Grid.Column="1">
<StackPanel  Orientation="Horizontal">
<CheckBox x:Name="TrafficCheck" Content="Traffic Flow" Foreground="Green"></CheckBox>
<CheckBox x:Name="LandmarksCheck" Content="Land Marks" Foreground="Green"></CheckBox>
</StackPanel>
<Grid Background="#00F9F9F9" >
<Grid.ColumnDefinitions>
<ColumnDefinition></ColumnDefinition>
</Grid.ColumnDefinitions>
<ComboBox Grid.Column="0" PlaceholderText="Map Color" x:Name="MapColorBox" Width="150"  Background="#FF23D1B1" SelectionChanged="MapColorBox_SelectionChanged" >
<ComboBoxItem  IsSelected="True" Content="Light" ></ComboBoxItem>
<ComboBoxItem Content="Dark" ></ComboBoxItem>
</ComboBox>
<ComboBox Grid.Column="1" PlaceholderText="Map Style" x:Name="MapStyleBox" Width="150"  Background="#FF23D1B1" HorizontalAlignment="Right" SelectionChanged="MapStyleBox_SelectionChanged" >
<ComboBoxItem  IsSelected="True" Content="None" ></ComboBoxItem>
<ComboBoxItem Content="Road" ></ComboBoxItem>
<ComboBoxItem Content="Aerial" ></ComboBoxItem>
<ComboBoxItem Content="AerialWithRoads" ></ComboBoxItem>
<ComboBoxItem Content="Terrain" ></ComboBoxItem>
</ComboBox>
</Grid>
</StackPanel>

We have added light and dark as the Map Color Scheme in the MapColorBox combobox and we have added 5 different Map Styles on MapStyleBox combobox. Each of the combobox has SelectionChanged event handler hooked up. Let’s see how MapColorBox_SelectionChanged looks like in MainPage.xaml.cs


        private void MapColorBox_SelectionChanged(object sender, SelectionChangedEventArgs e)
        {
            if (MapColorBox!=null)
            {
                string selectedColor = ((ComboBoxItem)MapColorBox.SelectedItem).Content.ToString();

                switch (selectedColor)
                {
                    case "Light":
                        MyMap.ColorScheme = MapColorScheme.Light;
                        break;
                    case "Dark":
                        MyMap.ColorScheme = MapColorScheme.Dark;
                        break;
                    default:
                        MyMap.ColorScheme = MapColorScheme.Light;
                        break;
                }
            }

        }

You can see that based on the SelectedItem on MapColorBox combobox we have assigned MapColorScheme of MyMap to MapColorScheme.Light or MapColorScheme.Dark

Map -8

Now, let’s focus on the MapStyleBox_SelectionChanged in the MainPage.xaml.cs


        private void MapStyleBox_SelectionChanged(object sender, SelectionChangedEventArgs e)
        {
            if (MapStyleBox != null)
            {
                string selectedStyle = ((ComboBoxItem)MapStyleBox.SelectedItem).Content.ToString();

                switch (selectedStyle)
                {
                    case "None":
                        MyMap.Style = MapStyle.None;
                        break;
                    case "Road":
                        MyMap.Style = MapStyle.Road;
                        break;
                    case "Aerial":
                        MyMap.Style = MapStyle.Aerial;
                        break;
                    case "AerialWithRoads":
                        MyMap.Style = MapStyle.AerialWithRoads;
                        break;
                    case "Terrain":
                        MyMap.Style = MapStyle.Terrain;
                        break;
                    default:
                        MyMap.Style = MapStyle.None;
                        break;
                }
            }
        }

This looks like the previous one too. All we did here is based on the MapStyleBox SelectedItem we have assigned MyMap.Style to appropriate MapStyle.

Map -9

Change Map Tile Source:

Now usually what we see is either bing or here maps on Windows Phone 8.1 Map Control. In some cases people might need to access different tile source like openstreet map. For the ones who doesn’t understand what a tilesource is, every map system is nothing but a series of square shaped images/tiles shown for a range of geo coordinate boundary.  It’s a grid of images shown based on the maps zoom level. When you zoom out or zoom in or roam around in the map, based on your X,Y and zoom level the map requests tiles of images to show you.

If you want to add/change a tiles layer, you have to change the TileSources collection of the map control. You can set the Zindex, tile pixel size and visibility. You can even forbid/allow stretching of the tiles while a higher resolution tile is being downloaded. You can define layer type of the tile source like BackgroundReplacement, BackgroundOverlay and RoadOverlay.

Let’s replace our default map tiles with openstreetmap tiles.


private void SetTileSourceToOSM()
{
var httpsource = new HttpMapTileDataSource("http://a.tile.openstreetmap.org/{zoomlevel}/{x}/{y}.png");
var tilesource = new MapTileSource(httpsource)
{
Layer = MapTileLayer.BackgroundReplacement
};
MyMap.Style = MapStyle.None;
MyMap.TileSources.Add(tilesource);
}

Now all we have to do is call this on our OnNavigatedTo method


protected override void OnNavigatedTo(NavigationEventArgs e)
{
SetTileSourceToOSM();
GetMyLocation();

}

And after the app is loaded, your map will look like this. But remember as we set our layer to BackgroundReplacement we will not have any kind of map styles or other features like TrafficFlow anymore.

You will also observe the loading of the map is pretty slow as the tiles are loaded from one source. So, we can balance the load by pointing to three different domains so the maps may load faster. All we have to do is rotate the subdomain of openstreet map in between a,b and c


private void SetTileSourceToOSM()
{
var next = "a";
var httpsource = new HttpMapTileDataSource("http://a.tile.openstreetmap.org/{zoomlevel}/{x}/{y}.png");

httpsource.UriRequested += (src, args) => {
next = GetNextDomain(next);
args.Request.Uri = new Uri("http://" + next + ".tile.openstreetmap.org/" +
args.ZoomLevel + "/" + args.X + "/" + args.Y + ".png");

};

var tilesource = new MapTileSource(httpsource)
{
Layer = MapTileLayer.BackgroundOverlay
};

MyMap.Style = MapStyle.None;
MyMap.TileSources.Add(tilesource);
}

private string GetNextDomain(string next)
{
string[] domains={"a", "b", "c"};

for(int count=0; count<domains.Length; count++)
{
if (domains[count] == next)
return domains[(count + 1) % domains.Length];
}

return next;
}

Here in the GetNextDomain method you will see that all it’s doing is it is actually rotating between the three subdomains of openstreet map.

And it looks like below:

Map -12

Map Events:

Maps in Windows Phone 8.1 comes with much easier touch events. Touch events now comes along with GeoPoint and local UI coordinates related to the touch point. All these comes along with MapTapped, MapDoubleTapped and MapHolding events.  To check if a location is visible on current map window you can use IsLocationInView().

We are going to try the MapTapped event for now. Select the MapControl, go over properties, go to event handlers and double click on the MapTapped event handler to create the method stub for that.

Now let’s go ahead and write the method down:


private async void MyMap_MapTapped(MapControl sender, MapInputEventArgs args)
{
Geopoint point = new Geopoint(args.Location.Position);

MapLocationFinderResult FinderResult =
await MapLocationFinder.FindLocationsAtAsync(point);

String format = "{0}, {1}, {2}";

if (FinderResult.Status == MapLocationFinderStatus.Success)
{
var selectedLocation=FinderResult.Locations.First();

string message= String.Format(format, selectedLocation.Address.Town, selectedLocation.Address.District, selectedLocation.Address.Country);
await ShowMessage(message);

}

}

Now here we have a sample reverse geocode query. And you can definitely see this is much easier here. You have to use MapLocationFinder class and it has a FindLocationsAtAsync method to get back with a geocoordinate based on your tap on the map. Actually it usually returns a list and we picked the first on the list and printed out the town, district and country on a messagedialog.

you can definitely check how the thing works on the phone

Map -11


Authenticating a Maps App:

The last thing that is left to do is authenticating a map app. You will see unless you provide a map control a map service AuthenticationToken it keeps asking it in the bottom of the map.

The details on that process is available here.

Our next tutorial would be on Routing , GeoFencing and Maps using MVVM.

The source code is uploaded here!

Stay frosty!


Reading and Writing to the Console

In the previous article we discussed about the basic structure of a C# program. Today we will see reading and writing operation to the console. We will see a little more interactive sample program than the previous today. Our program will ask the user his/her name and then print a welcome message with the name of the user which he/she just enter.

To write something to the console we have two methods under System namespace, one is Write and the other is WriteLine. Only the difference between these two is, if we use WriteLine then after writing something to the console it will print a new line also but in Write method it will just print something. No new line will be printed here.

For an example if we write in the main method Console.Write(“Hello World ”); then the output should be as follows-

Hello World press any key to continue

The line “press any key to continue” indicates that the program is terminated. Instead of this method if we use Console.WriteLine(“Hello World ”); then the output should be as follows-

Hello World

press any key to continue

Here we can see that the line “press any key to continue” is in a new line. So the method Writeline prints a new line after writing something to the console.

Similarly there are to methods for reading something in the console, one is Read and the other is ReadLine. The Read method read integer type from the console and the Readline method read string type from the console. So if we write Console.ReadLine() then we have to store the returned result in a string type variable so that we can use it later in the program.

Now let’s see the code our sample program. It is as follows-

using System;
class Program
{
   static void Main()
    {
        Console.WriteLine("What is your name?");
        string name = Console.ReadLine();
        Console.WriteLine("Welcome "+ name);
    }
}

Here we can see in the MAIN method first we are printing a message asking the user’s name. Then when our next line of code executed it waits for the user input that is our read operation from the console. When the user enters something and press the Enter button then Console.Readline methos reads what is entered in the console and return it as a string type. Here we store the returned string in a string type variable named name. So what user entered in the console now stored in the variable. Then in the next line we write in the console “Welcome “concatenated with the name of the user. Here we are concatenating two string- One is “Welcome ” and the other is string type variable called name with the “+” sign in the WriteLine method.
There are actually two ways of writing something in the console. They are-
• Concatenation
• Place holder syntax
We already have seen the concatenation method of writing something to the console. Now we will see the place holder syntax in the same program. If we want to use place holder syntax in the same program then the code should be as follows-

using System;
class Program
{
   static void Main()
    {
        Console.WriteLine("What is your name?");
        string name = Console.ReadLine();
        Console.WriteLine("Welcome {0}",name);
    }
}

Here we can see in case of “+” operator we use “{0}” in the string with Welcome. This is called the place holder. When we run the program, the value of the variables that we pass after comma in the WriteLine method replaces the place holder. So if we run this piece of code we will see the same result here.
The place holder syntax is more preferable than the Concatenation process. To see how place holder syntax gives more capability let’s modify the above program. Now we will ask the user to enter his/her first name then after reading the first name we will ask for last name and after reading that we will print the first name and last name separated by a comma with the welcome message. To do that the program should be as follows –

using System;
class Program
{
   static void Main()
    {
        Console.WriteLine("What is your first name?");
        string firstname = Console.ReadLine();
        Console.WriteLine("What is your last name?");
        string lastname = Console.ReadLine();
        Console.WriteLine("Welcome {0},{1}",firstname,lastname);
    }
}

Here in the code we can see there are two place holders and there are two string type variable as well to store the first name and last name of user. When we write the welcome message in WriteLine method we use two placeholder and two variable to replace the place holder. In the same way we can use as many as place holders we required. We just have to surround the number of that place holder with curly braces. That’s why place holder syntax is more preferable than the concatenation method.

Saving a SpeechSynthesis Audio in a windows store/phone app

Usually after doing a little speech synthesizing in our phone we usually stumble on one question, can I save this stream?
Luckily you can! All you gotta do is pull this out of your sleeve. 🙂


var synth = Windows.Media.SpeechSynthesis.SpeechSynthesizer();

SpeechSynthesisStream speechstream = await synth.SynthesizeTextToStreamAsync("Hello People");

using(var reader = new DataReader(speechstream))
{

await reader.LoadAsync((uint)stream.Size);

IBuffer buffer = reader.ReadBuffer((uint)stream.Size);

await FileIO.WriteBufferAsync(outputFile, buffer);

}

And, you’re done! Your file would be a .wav file of course.

Windows Phone 8.1 for Newbies – Navigation of Windows Phone 8.1 – Frame, Page and SuspensionManager

Windows Phone for Newbies সিরিজে এবার আমাদের বিষয় Windows Phone 8.1 এর নেভিগেশন মডেল। আমরা আজকে দেখবো আপনি একটি নতুন একটি অ্যাপ এ নেভিগেশন কিভাবে handle করবেন। আরো দেখবো আসলে নেভিগেশন কি করে হয়।

শুরুতে আমাদের দরকার একটি নতুন অ্যাপ। তো চলে যান আপনার Visual Studio তে। আমি ব্যবহার করছি Visual Studio 2013 Community Edition. আসুন খুলে নেই নতুন একটি প্রজেক্ট। চলে যান ফাইল -> নিউ প্রজেক্ট

Navigation-1

এখানে দেখতে পাবেন আপনার জন্যে বেশ কয়েকটি প্রজেক্ট টেমপ্লেট আছে। Blank, Pivot, Hub app এই তিনটি টেমপ্লেট আছে। আপনি যদি Pivot অথবা hub টেমপ্লেট সিলেক্ট করেন তাহলে NavigationHelper, SuspensionManager এর মতো Helper Class গুলো পেয়ে যাবেন। কিন্তু এখনকার জন্যে সেগুলো আপনার জন্যে একটু বেশি হয়ে যাবে। আসুন আমরা blank template নিয়ে এগিয়ে যাই।

তো তৈরী করে ফেলুন একটি Blank App. আমি আগেই বলেছি আমরা কিছু Helper Class পাবোনা এই টেমপ্লেট এ। একটি ছোট হ্যাক আছে সেগুলো এই টেমপ্লেট এ নিয়ে আসার। প্রথমে আপনি MainPage.xaml পেজটি Solution explorer থেকে delete করে দিন। এবার Solution Explorer এ সলুশ্যন এর নাম এর ওপরে right click করে Add-> New Item এ চলে যান।

Navigation-2

এরপর সিলেক্ট করুন Basic Page. দেখবেন নিচের মতো একটি পপ আপ ভেসে উঠবে।

Navigation-3

Navigation-4

এখন দেখবেন আপনার প্রজেক্টের Common Folder এ নিচের class গুলো যোগ হয়ে গিয়েছে।

Navigation-5

আমাদের আজকের বিষয় যেহেতু Navigation আমরা শুধু NavigationHelper আর SuspensionManager নিয়ে কথা বলবো।

SuspensionManager এবং Frame:

Windows Phone 8.1 এ আপনার UI টি আসলে বসে থাকে একটি Frame UI control এর উপর এবং এই Frame টি জানে কিভাবে এক Page হতে অন্য Page এ নেভিগেট করতে হয়। এখানেই উইন্ডোজ ফোন ৮.১ উইন্ডোজ ফোন ৮ থেকে আলাদা। এখানে একটি page এ একাধিক Frame থাকতে পারে। আপনি চাইলেই পারেন একটি Single Page Application বানাতে। এবং যেহেতু একটি Frame এ আপনার Navigation History (কোন পেইজ থেকে কোন পেইজে গিয়েছেন তার লিস্ট) থাকে সেহেতু একটি Page এ multiple frame থাকলে multiple navigation history ও থাকতে পারে। তবে তার কথায় এখন যাচ্ছিনা।

আসুন আমরা দেখি Frame কোথায় তৈরী হয়। এটি তৈরী হয় Application.OnLaunched (app.xaml.cs) এ। এটি Window.content property তে দেখে যে main UI টি তৈরী হয়েছে কিনা। না হলে তৈরী করে নেয়। এভাবেই আপনার root frame তৈরী হয়।

protected override void OnLaunched(LaunchActivatedEventArgs e)
        {
#if DEBUG
            if (System.Diagnostics.Debugger.IsAttached)
            {
                this.DebugSettings.EnableFrameRateCounter = true;
            }
#endif

            Frame rootFrame = Window.Current.Content as Frame;

            // Do not repeat app initialization when the Window already has content,
            // just ensure that the window is active
            if (rootFrame == null)
            {
                // Create a Frame to act as the navigation context and navigate to the first page
                rootFrame = new Frame();

                // TODO: change this value to a cache size that is appropriate for your application
                rootFrame.CacheSize = 1;

                if (e.PreviousExecutionState == ApplicationExecutionState.Terminated)
                {
                    // TODO: Load state from previously suspended application
                }

                // Place the frame in the current Window
                Window.Current.Content = rootFrame;
            }

            if (rootFrame.Content == null)
            {
                // Removes the turnstile navigation for startup.
                if (rootFrame.ContentTransitions != null)
                {
                    this.transitions = new TransitionCollection();
                    foreach (var c in rootFrame.ContentTransitions)
                    {
                        this.transitions.Add(c);
                    }
                }

                rootFrame.ContentTransitions = null;
                rootFrame.Navigated += this.RootFrame_FirstNavigated;

                // When the navigation stack isn't restored navigate to the first page,
                // configuring the new page by passing required information as a navigation
                // parameter
                if (!rootFrame.Navigate(typeof(MainPage), e.Arguments))
                {
                    throw new Exception("Failed to create initial page");
                }
            }

            // Ensure the current window is active
            Window.Current.Activate();
        }

এখন একটু ভালোমতো খেয়াল করে দেখবেন frame একটি content control (এর একটি content property) আছে আর কি। এর বেশ কিছু method আছে যেমন (Navigate, CanNavigate) এবং এটি আপনার Navigation BackStack manage করে। কিন্তু যে দুটো ফাংশন নিয়ে আমি কথা বলতে চাই তা হচ্ছে

  • GetNavigationState
  • SetNavigationState

মনে করি আমাদের অ্যাপ এ ৩টি পেইজ আছে, প্রত্যেক পেইজে navigate করার সময় একটি param পাঠানো যায়। তাহলে navigation stack টা দাঁড়ায় এরকম Page 1 ( param 1 ) –> Page 2 ( param 2 ) –> Page 3 ( param 3 )

এখন আমরা যদি চাই কোন Page এর Frame এর state জানতে আমরা GetNavigationState() ব্যবহার করতে পারি। আমরা চাইলে Frame টি destroy করতে পারি এবং নতুন করে recreate করতে পারি। এবং চাইলে Frame টি যেখানে ছিলো সেইখানে তাকে রেখে আসতে পারি SetNavigationState() ফাংশনটি ব্যবহার করে।

যদি আমাদের navigation parameter এ সব দেয়া থাকে (যেটা navigate করার সময় আমরা পাঠিয়েছিলাম) তাহলে আমরা যে কোন Frame যে কোন অবস্থা থেকে পুনরায় তৈরী করতে পারবো। এটি কাজে লাগে তখন যখন আমাদের কোন অ্যাপ OS থেকে terminate হয়ে যায় এবং আমরা অ্যাপটিকে ঠিক আগের জায়গা থেকে শুরু করাতে চাই। আর এই কাজটি করতে পারে SuspensionManager class.

এখন SuspensionManager এ আমাদের Frame restore করতে চাইলে একে জানতে হবে Frame কোনটি। তাই Grid, Hub এইসব প্রজেক্ট টেমপ্লেট এ SuspensionManager এ Frame register করা থাকে। আপনি যদি blank template ব্যবহার করে থাকেন তাহলে আপনার OnLaunched মেথডে নিচের কোডটুকু যোগ করে ফেলুন।


Frame rootFrame = Window.Current.Content as Frame;

// Do not repeat app initialization when the Window already has content,
// just ensure that the window is active
if (rootFrame == null)
{
// Create a Frame to act as the navigation context and navigate to the first page
rootFrame = new Frame();

// MT: Register the Frame with the SuspensionManager.
SuspensionManager.RegisterFrame(rootFrame, "rootFrameKey");

তাহলে আসুন দেখি আমরা এতোক্ষণ কি দেখলাম।

navigation -5

এই register করার মাধ্যমে SuspensionManager জেনে নেয় এই Frame টি তে প্রয়োজনের সময় সে ফেরত আসতে পারবে।

SuspensionManager কিভাবে Frame restore করে

আসুন দেখি কিভাবে app terminate হয়ে যাবার পর ও আমরা একই Frame এ ফেরত যেতে পারি। আপনার Application.OnLaunched override এ এই কোডটুকু already আছে:


if (e.PreviousExecutionState == ApplicationExecutionState.Terminated)
{
//TODO: Load state from previously suspended application
}

সাথে এইটুকু যোগ করে নিলেই হলো। এখন আপনার অ্যাপ Terminate হয়ে গেলেও user তার আগের Frame এ ফেরত যেতে পারবে। News app এর feature হিসেবে চমৎকার।


if (e.PreviousExecutionState == ApplicationExecutionState.Terminated)
{
//TODO: Load state from previously suspended application
await SuspensionManager.RestoreAsync();
}

এটি একটি async call কারণ SuspensionManager আপনার ফোনের Storage এ গিয়ে Frame navigation history খুঁজে বের করে এবং Frame টি কে SetNavigationState method এর মাধ্যমে তার পুরনো জায়গায় ফেরত দিয়ে আসে।

navigation - 6

মনে রাখবেন সব সময় এই কাজটি করবার দরকার নেই । অনেক আগে একটি অ্যাপ বন্ধ হয়ে গেলে সেটিকে আবার সেই পুরনো স্টেট এ নিয়ে যাবার দরকার নেই। আপনি চাইলেই এরকম একটি কোড সেগমেন্ট রাখতে পারেন যেখানে একটি নির্দিষ্ট সময় বা ইউজার বললে অ্যাপটি আর Frame restore করবেনা।

মজার ব্যাপার হচ্ছে restore করতে হলে state save করতে হয়। আমরা register এবং restore করেছি। save করিনি। state save না করলে restore কি করে হবে বলুন? 🙂

SuspensionManager কিভাবে App Suspension এর সময় State save করে

যখনি আপনার অ্যাপ টি Suspend হচ্ছে (terminate নয়) তখন ই আপনার অ্যাপটির SuspensionManager এর state disk এ save করলে পরে আপনি অ্যাপটি চালু করলে সে আবার পুনরায় আগের অবস্থায় Frame টি কে নিয়ে যাবে।

navigation - 7

যেহেতু এটি Suspension এর ইস্যু তাই আমাদের Application.OnSuspending handler লিখতে হবে এবং এটিতে আপনি Frame State save করতে পারেন এভাবে:


private async void OnSuspending(object sender, SuspendingEventArgs e)
{
var deferral = e.SuspendingOperation.GetDeferral();

await SuspensionManager.SaveAsync();

deferral.Complete();
}

উপরের ছবিটি খেয়াল করে দেখলে বুঝবেন SuspensionManager একটি Global set of state রাখে নিজের কাছে যেটি আপনি SuspensionManager.SessionState হতে ব্যবহার করতে পারেন। এই Global State এর মধ্যে থাকে একটি Dictionary থাকে যাতে প্রতিটি Frame থাকে এবং তার মধ্যে প্রতিটি Page এর State এর একটি Dictionary থাকে যা NavigationHelper class ব্যবহার করে। আমরা এটি নিয়ে একটু পরে দেখবো।

কিছু নতুন Page যোগ করা:

আমি জানি অনেকেই সরাসরি এই জিনিসটি দেখতে চান কিন্তু যেহেতু Windows Phone 8.1 একটু আলাদা Windows Phone 8 থেকে তাই Frame এবং Page এর ব্যপারে কিছু না বললে ই নয়। আপনি যদি পুরোটা আগে পড়ে থাকেন তাহলে আপনি অবশ্যই উইন্ডোজ ফোন ৮.১ এর নেভিগেশন মডেল বেশ ভালোভাবে জানেন।

আমরা চলে যাই আবার Visual Studio 2013 এ। আমরা উপরে লেখা উপায়ে আরো দুটি Basic Page (Blank page নয়) যোগ করবো। প্রতিটি ক্ষেত্রেই আমি Add New Item dialog টি ব্যবহার করেছি।

আমার যোগ করা Page গুলোর নাম SecondPage এবং ThirdPage

আমার MainPage.xaml টি নিচের মতো:


<Page x:Name="pageRoot"
x:Class="BlankApp.SecondPage"
DataContext="{Binding DefaultViewModel, RelativeSource={RelativeSource Self}}"
xmlns="http://schemas.microsoft.com/winfx/2006/xaml/presentation"
xmlns:x="http://schemas.microsoft.com/winfx/2006/xaml"
xmlns:local="using:BlankApp"
xmlns:common="using:BlankApp.Common"
xmlns:d="http://schemas.microsoft.com/expression/blend/2008"
xmlns:mc="http://schemas.openxmlformats.org/markup-compatibility/2006"
mc:Ignorable="d">

<Grid Background="Green">
<Grid.ChildrenTransitions>
<TransitionCollection>
<EntranceThemeTransition />
</TransitionCollection>
</Grid.ChildrenTransitions>
<Grid.RowDefinitions>
<RowDefinition Height="140" />
<RowDefinition Height="*" />
</Grid.RowDefinitions>

<!-- Back button and page title -->
<Grid>
<Grid.ColumnDefinitions>
<ColumnDefinition Width="120" />
<ColumnDefinition Width="*" />
</Grid.ColumnDefinitions>

<TextBlock x:Name="pageTitle"
Style="{StaticResource HeaderTextBlockStyle}"
Grid.Column="1"
IsHitTestVisible="false"
TextWrapping="NoWrap"
VerticalAlignment="Bottom"
Margin="0,0,30,40" />
</Grid>
<StackPanel Grid.Row="1"
Margin="120,0,0,0">
<TextBox x:Name="txtMainPageOne"
Text="Not Set" />
<Button Content="Navigate Second Page"
Click="OnNavigateSecondPage" />
</StackPanel>
</Grid>
</Page>

সবচেয়ে কাজে লাগার Method টি হচ্ছে OnNavigateSecondPage যেটি আপনাকে Second Page এ নিয়ে যাবে।


private void OnNavigateSecondPage(object sender, RoutedEventArgs e)
{
this.Frame.Navigate(typeof(SecondPage), this.txtMainPageOne.Text);
}

খেয়াল করে দেখবেন txtMainPageOne টেক্সটবক্স এ যা ছিলো তা আমি parameter হিসেবে SecondPage.xaml এ পাঠিয়ে দিয়েছি।

SeondPage.xaml দেখতে এরকম:


<Page x:Name="pageRoot"
x:Class="BlankApp.SecondPage"
DataContext="{Binding DefaultViewModel, RelativeSource={RelativeSource Self}}"
xmlns="http://schemas.microsoft.com/winfx/2006/xaml/presentation"
xmlns:x="http://schemas.microsoft.com/winfx/2006/xaml"
xmlns:local="using:BlankApp"
xmlns:common="using:BlankApp.Common"
xmlns:d="http://schemas.microsoft.com/expression/blend/2008"
xmlns:mc="http://schemas.openxmlformats.org/markup-compatibility/2006"
mc:Ignorable="d">

<Grid Background="Green">
<Grid.ChildrenTransitions>
<TransitionCollection>
<EntranceThemeTransition />
</TransitionCollection>
</Grid.ChildrenTransitions>
<Grid.RowDefinitions>
<RowDefinition Height="140" />
<RowDefinition Height="*" />
</Grid.RowDefinitions>

<!-- Back button and page title -->
<Grid>
<Grid.ColumnDefinitions>
<ColumnDefinition Width="120" />
<ColumnDefinition Width="*" />
</Grid.ColumnDefinitions>

<TextBlock x:Name="pageTitle"
Style="{StaticResource HeaderTextBlockStyle}"
Grid.Column="1"
IsHitTestVisible="false"
TextWrapping="NoWrap"
VerticalAlignment="Bottom"
Margin="0,0,30,40" />
</Grid>
<StackPanel Grid.Row="1"
Margin="120,0,0,0">
<TextBox x:Name="txtSecondPageOne"
Text="Not Set" />
<Button Content="Navigate Thid Page"
Click="OnNavigateThirdPage" />
</StackPanel>
</Grid>
</Page>

তার মানে MainPage থেকে পাঠানো parameter আমি access করতে পারবো navigationHelper_LoadState method এ।


private void navigationHelper_LoadState(object sender, LoadStateEventArgs e)
{
this.pageTitle.Text = (string)e.NavigationParameter;
}

private void OnNavigateThirdPage(object sender, RoutedEventArgs e)
{
this.Frame.Navigate(typeof(ThirdPage), this.txtSecondPageOne.Text);
}

দেখতেই পাচ্ছেন SeconPage থেকে ThirdPage এও যাবার সময় আমি একটি parameter পাঠিয়ে দিচ্ছি যা txtSecondPageOne textbox এ লেখা। এবং NavigationHelper class এখন আমাদের কাজে লাগলো কারণ এটি মাত্রই আমাদের Navigation Parameter e হতে MainPage.xaml হতে পাঠানো parameter টি লোড করলো।

আমাদের ThirdPage.xaml টি হলো:


<Page x:Name="pageRoot"
x:Class="BlankApp.ThirdPage"
DataContext="{Binding DefaultViewModel, RelativeSource={RelativeSource Self}}"
xmlns="http://schemas.microsoft.com/winfx/2006/xaml/presentation"
xmlns:x="http://schemas.microsoft.com/winfx/2006/xaml"
xmlns:local="using:BlankApp"
xmlns:common="using:BlankApp.Common"
xmlns:d="http://schemas.microsoft.com/expression/blend/2008"
xmlns:mc="http://schemas.openxmlformats.org/markup-compatibility/2006"
mc:Ignorable="d">

<Grid Background="Orange">
<Grid.ChildrenTransitions>
<TransitionCollection>
<EntranceThemeTransition />
</TransitionCollection>
</Grid.ChildrenTransitions>
<Grid.RowDefinitions>
<RowDefinition Height="140" />
<RowDefinition Height="*" />
</Grid.RowDefinitions>

<!-- Back button and page title -->
<Grid>
<Grid.ColumnDefinitions>
<ColumnDefinition Width="120" />
<ColumnDefinition Width="*" />
</Grid.ColumnDefinitions>

<TextBlock x:Name="pageTitle"
Style="{StaticResource HeaderTextBlockStyle}"
Grid.Column="1"
IsHitTestVisible="false"
TextWrapping="NoWrap"
VerticalAlignment="Bottom"
Margin="0,0,30,40" />
</Grid>
</Grid>

</Page>

এখন খেয়াল করে দেখবেন আপনার অ্যাপটি নেভিগেট করার সময় প্যারামিটার ঠিকমতো পাস করে নিয়ে যাচ্ছে কিন্তু ব্যাক বাটন চাপলে অ্যাপটি বন্ধ হয়ে যাচ্ছে।

navigation - 8


এর কারণ এবং বের হবার উপায় আমরা দেখবো পরের পোস্ট এ। সেখানে আরো দেখবো কিভাবে পেজ ক্যাশ করতে হয়। 🙂


Introduction(Understand the basic structure of a c# program)

Hello Everyone!! In this series of tutorial we are going to discuss about the basic elements of C#. Like all others OOP (Object Oriented Programming) languages C# is also an OOP language that means the three qualities that make a programming language object oriented can be found in C# also. The qualities are-

  • Encapsulation
  • Polymorphism
  • Inheritance

We will understand each of this qualities in the later session of this series. In this article we will understand the basic structure of a C# program. All the sample programs of this series is going to be a Console Application and we are using Visual Studio as the IDE. So first we will learn how to open a console application in Visual Studio.

A console application is nothing but a program that can be executed in the command prompt of our Computer. To open a console application first we have to open visual studio then from the menu choose File-> New-> Project. Then another windows will pop up then in the popup window choose Visual C# in the left and you can see console application there. Choose Console Application template and give it a suitable name, you can choose the location where to save this program in your pc from here also. When you choose everything click the OK button to create the program.

OpenNewProject

When you click the OK button the program will be created and you will see the following code –

using System;
using System.Collections.Generic;
using System.Linq;
using System.Text;
using System.Threading.Tasks;

namespace introduction
{
    class Program
    {
        static void Main()
        {
        }
    }
}

Now for simplicity we will remove some code from the above and make it a very basic structure of a C# program. After removing those code the above program will looks like the following-

using System;

class Program
{
    static void Main()
    {

    }
}

The above program can be said as a very basic structure of C# program. Now we will describe each line of the above program.
The first line is-
using System;

This is called the namespace declaration. A namespace is nothing but a collection of some classes, enums, structs, interfaces and delegates. What are all these we will discuss later. A namespace can hold another namespace also. For now to understand the above line we can say there are some built-in methods in this namespace called System and to use those methods and classes we have to declare the namespace by using keyword at the top. Just for an example if we want to print something in the console then we can write the following code-

using System;

class Program
{
    static void Main()
    {
        Console.WriteLine("Hello world");
    }
}

To run the above code press Ctrl+F5. Then the command prompt should appear with the message “Hello world”.
The definition of this Writeline method is written in the namespace called System. Now if we remove the using System; line from our code then we will get an error in the line Console.WriteLine(“Hello world”);
Because now the definition of WRITELINE method is missing from our program. If we want to remove the namespace declaration then we have to write the name in the line when we use a method belongs to that namespace as follows-

class Program
{
    static void Main()
    {
        System.Console.WriteLine("Hello world");
    }
}

Namespace is used to organize our code more effectively. If you don’t use the namespace declaration at the top then each time when you use a method you have to write its namespace which is more time consuming. So the use of namespace declaration is important.
Now the next thing in our basic structure is a Class declaration. We assume that you are familiar with OOP and if you are so then you are already known to class. Like other OOP language the class declaration in C# is exactly same. Anything you write in C# is belongs to a class. There are different types of class in C#. We will discuss it later in this series. Just for now we can say any piece of code should be inside of a class. Here the name of our class is Program.
Then there is also a method named Main and it is a static method. What is static method and class we will discuss it later. Now what we have to understand is the Main method is the starting point of our program. When we run our code it start to execute each line from the beginning of Main method and end when the Main method ends. To prove this, we can declare another same method named Main2 and in this method we print another message to differentiate the two method. We can consider the following piece of code-

using System;
class Program
{
    static void Main2()
    {
        Console.WriteLine("Another Message");
    }
    static void Main()
    {
        Console.WriteLine("Hello world");
    }
}

Here if we run the program we will see that only the message “Hello world” is printed. Another method named MAIN2 is not executed. So it’s proved that our program start from Main method and terminate when the MAIN method terminates. If we want to print the 2nd message then we have to call the MAIN2 method from MAIN method before it terminates. We can do it by the following-

using System;
class Program
{
    static void Main2()
    {
        Console.WriteLine("Another Message");
    }
    static void Main()
    {
        Console.WriteLine("Hello world");
        Main2();
    }
}

Now we should be able to see both messages.
In this article we see the basic structure of a C# programming and we can sum up with the following decisions from the above discussion-
• The namespace declaration using System; indicates that you are using System namespace
• A namespace is a collection of Classes, Structs, Delegates, Enums, Interfaces and used to organize the code more effectively.
• Our program starts with the Main method and terminates when the Main method terminates.