In my last post, we had a look at NEO-CLI. Today, we will have a look at the basic concept of consensus NEO implements inside. There are a lot of ways to implement consensus in any blockchain platform you see around. All of them tends to solve the historical problem named “The Byzantine Generals’ Problem”. If you want to read the original paper on the problem, here it is.
The generals and their problems
The simplest way one could possibly describe this problem would be to describe it as the problem of determining the true outcome of a vote. One might wonder how that can be a problem since counting the votes and tallying them up should easily tell the result. Let’s imagine a scenario where we have 5 generals. They want to attack a city in the middle but all of them are in different geographic location. In a simplistic picture, the setup would look something like:
They need to attack or retreat in sync or according to a predetermined plan. To act in unison, they proposed a way to vote for the next move. They decided to vote daily and the majority vote wins. Since they are not in the same geographic place, they use couriers to convey their vote amongst each other.
One doesn’t need to think for long to land on the conclusion that this whole plan has some inherent flaws. First, the couriers are humans and not that reliable, they can get captured, bribed to work for the enemy. They can get killed, lose the message or deliver the wrong message. Secondly, the generals themselves can be bribed in the same way to betray each other. And last but not the least, any general can make an inappropriate decision due to stupidity and failure to assess the situation or both.
Distributed computing by default inherits this problem since it works with a similar setup. Actors in the system can fall into the same trap as these generals. They can malfunction or act in an untrustworthy way to threaten or destabilize the system.
Delegated Byzantine Fault Tolerance
As it was mentioned before that there are numerous ways to solve this problem. Bitcoin paved a way of solving this problem through its Proof Of Work mechanism. Hyperledger Fabric improved upon the same principles through Practical Byzantine Fault Tolerance mechanism. NEO, on the other hand, proposes Delegated Byzantine Fault Tolerance.
Let’s assume we are living in Zion and there is a leader, preferably NEO. In this case, NEO is a delegate of Zion. In this world, he just can’t assume this role by his heroics, he has to gain votes from the citizen of Zion. All citizen votes for delegates like NEO and there are multiple delegates. The delegates are responsible for making the laws of Zion.
In any moment of time, if the citizen of Zion is not satisfied with a delegates proposal of laws, they can vote for a different delegate next time. Delegates are constantly notified of the demands of the citizen. They document it on a ledger, and yes you thought it right, this ledger is the analogy of our blockchain. These demands are added one after another and laws are passed focused towards keeping the citizens of Zion happy.
But a single delegate can’t pass a law anytime he wishes to. The laws are passed in a periodic manner. When it is time to pass a law, a random delegate is chosen, let’s call him the speaker. The speaker proposes the law based on the demands of the citizens. The job of the speaker is to show how the proposed law increases the happiness index of Zion. And then he shares the law he is proposing to the other delegates. The delegates then have the job to decide whether the speaker’s calculations were correct and the laws are aligned to the common goal. They also verify the newly improved happiness index calculation. If 66% of the delegates believe that the calculation is correct and it is an improvement, the law gets finalized and passed.
What if the new law has failed to get 66% of delegates approval? Then the whole process starts over and a new speaker is selected.
How this is translated in NEO blockchain
This whole concept is reflected in NEO blockchain. Anyone who owns NEO is a stakeholder, thus a citizen. They want to create transactions, transfer, exchange assets. They do not participate in the bookkeeping of the blockchain. To do that one node needs to be a delegate as in NEO blockchain world, a bookkeeping node. There are certain criteria to be fulfilled to be a bookkeeping node in NEO blockchain. This includes dedicated internet connections and a certain amount of GAS. The demands are analogous to transactions. When they are put together by a bookkeeping node, a new block is created, which is analogous to a law. The happiness number is the hash of the aforementioned block.
Common Pitfalls: The dishonest speaker
What if the speaker is dishonest? What if he sends wrong versions of the law to some of the delegates?
In this scene, the evil speaker sends different versions of the law to different delegates. So, when the delegates communicate with each other they send different versions of the law. In this case, the leftmost delegate will get the accurate version of the law and will be able to calculate the happiness index properly. The rest of the delegates will fail to do so, failing the consensus.
Common Pitfalls: The dishonest delegate
The dishonest delegate scenario should be self-explanatory now.
In this scenario, we have an honest speaker who sends the same version of the law to every delegate but the rightmost delegate is dishonest. He sends a different version B to everyone else. In this case, 2 of the delegates will be able to calculate the happiness index properly. But the will only be able to verify it from the speaker’s version. It will reach 66% consensus and the law will be passed. But the result of this session will deem the rightmost delegate to be faulty. This data can be used for the next time of citizen vote where they chose their delegates.
By the definition here the minimum threshold for faulty delegates in the system is f=(n-1)/3 where n is the number of active delegate nodes.
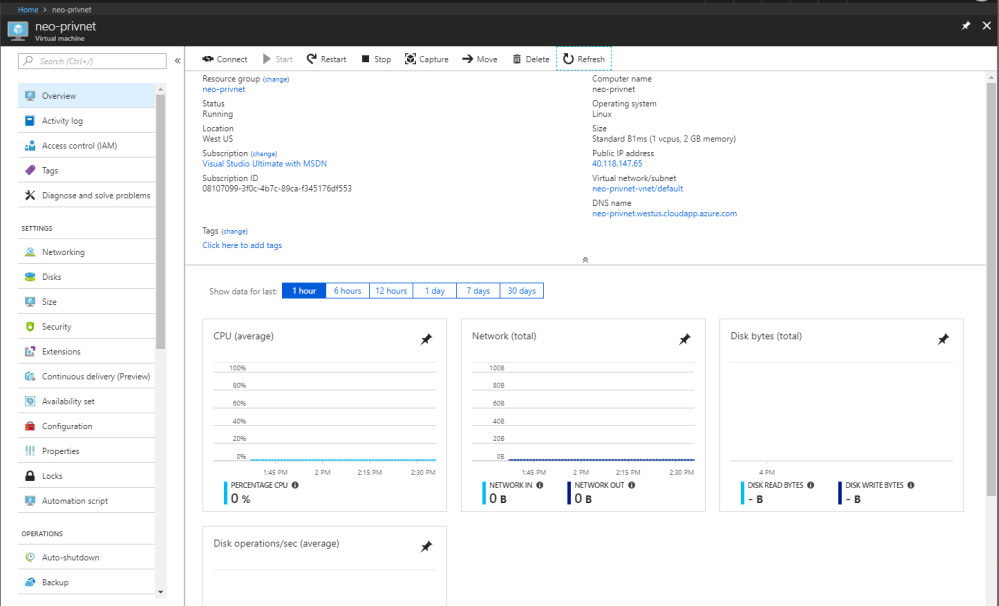
In my previous post, we started with a small NEO private net. Today, we will take a quick look into NEO-CLI and what it offers. Although it is named NEO-CLI, in practicality, this is a full blown NEO blockchain node instead of just a CLI tool to communicate with it. NEO offers two node types – GUI and CLI. I think the suffix comes from that and I wanted to explicitly mention it since it is a tad confusing.
At first, we will try to connect to our newly created private net. To do that, we will start with installing a separate installation of NEO-CLI. Installing NEO-CLI is pretty straight forward. You will need .Net core installed in your machine. If you don’t follow the instruction here.
Installation
I’m currently using an Ubuntu 16.04 as a reference OS. After installing .Net core framework you will need to install the NEO-CLI package. And since Im on a debian it was quite easy to do so the following way:
We are testing and my local machine doesn’t have a frame of reference of the test private net we just created over Azure. To give this node a frame of reference we need to configure its SeedList to point to our own private net. What is a seed list? Simply put, it is nothing more than a list of URLs as described in the official NEO documentation. This is the first set of nodes NEO-CLI will try to connect to when it boots up.
To configure the aforementioned SeedList, we will modify the protocol.json file, under the neo-cli directory.
We need to update the SeedList section of the configuration the following way:
If you opt to use the public test net, rename the protocol.testnet.json to protocol.json and you should be good to go.
Booting up the node
Now, it is time to start the node, we are going to invoke:
dotnet neo-cli.dll --log --nopeers
The log option will log the smart contract information and nopeers makes the node only connect to the seed nodes from the configuration file. this is something we want since this is a private network.
Creating a new wallet
Let’s create a new wallet then.
neo> create wallet mywallet.db3
NEO-CLI will ask for password twice for the wallet, pick your desired password. And copy the address and pubkey to keep it a safe place. If you forget the public key you can use list key command to see it.
More on protocol.json
Before we end this one, we will have one last look at the protocol.json configuration file for our node.
The Magic field contains a uint value that denotes the source network of the message.
The StandbyValidators field are the validating nodes in the private node. It is the list of public keys of aforementioned validating nodes. We created 4 wallet here in this specific example and thus we have 4 entries here. 4 is the minimum number of nodes here to be listed for reaching a consensus.
SeedList is configured to localhost in this example configuration since NEO-CLI is booting up against the localhost node.
SystemFee section is the section that defines the system fee. As the configuration states, the registration fee for assets is 100000 GAS depicted by the RegisterTransaction field. EnrollmentTransaction field defines the registration fee for book-keepers. IssueTransaction is the fee for distributing assets. Finally the PublishTransaction is the fee for smart contracts.
That sums it up for this time. Next, we are going to have a look at how consensus works in NEO. And finally we will write a smart contract on NEO in C#. 🙂
If you are a blockchain enthusiast in these days, there is a good chance you have heard about NEO. NEO, arguably dubbed the “Ethereum Killer” promises to be a tailor made dApp platform for digitizing assets. This blog is not scoped to give everyone an introduction on NEO itself. So, I highly suggest reading the white paper from here.
What interests me mostly apart from NEOs approach with GAS and NEO to drive an economy for digitizing and managing assets is how it is built. Since it has its “ties” with Ethereum, my initial idea was it would probably be another Ethereum fork. And to my surprise, NEO is actually built from scratch. It has been on github since 2015 and totally built on C#. To be specific, net core. A quick look at the .csproj file tells me this is running on Asp.net core 2.0.2 now. Apart from whatever the promise it brings, this alone justifies my interest on how this is built.
Another thing that interests me here is how NEO approaches developers. Instead of having tailor made languages for smart contracts, NEO allows developer to write smart contracts with the the popular programming languages already. This list includes C#, Java, Golang and JavaScript. NeoVM, the small virtual machine that allows this to happen is .net core driven and hosted here.
The goal of today here is to deploy a NEO private net on Azure. Don’t get confused since for this time I won’t be using Azure Blockchain As A Service. Although the Azure Blockchain Workbench is indeed intriguing, that is a story for another day since Azure BAAS doesn’t support NEO out of the box yet. So we will go ahead with an Ubuntu Server 17.10.
We will use the test net ports here, not the main net. We are going to add port 20332-20336, 30332-30336 to the inbound rules.
When that is taken care of, we will move to the final validation stage and create the VM. Now from the information found newly created resource page we would go ahead and ssh into the newly created VM.
If you are on a OSX, Linux or basically any *nix you could use your native terminal to ssh to the new VM. If you are on windows, my choice is usually WSL.
To verify docker-ce is running, try the official hello world or ask systemctl.
$ sudo docker run hello-world
$ sudo systemctl status docker
After all said and done, we will pull the docker image cityofzion/neo-privatenet. This is a 4 Node NEO private net with 100M NEO and a lot of GAS. It also comes with a pre-loaded wallet. To pull and run the docker image, do the following:
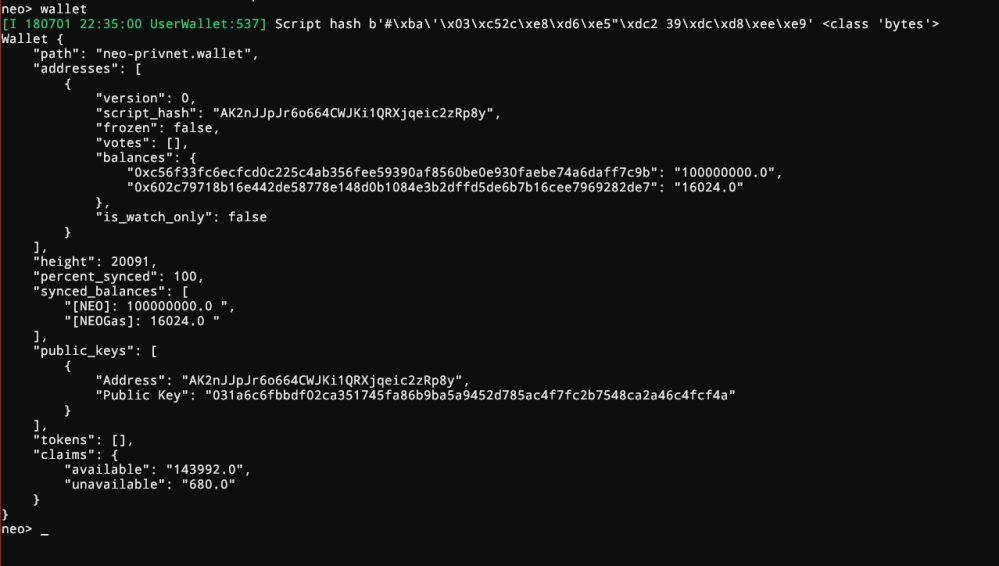
Now, we are going to check out that preloaded wallet inside that docker container. To do that, execute the following:
$ sudo docker exec -it neo-privnet /bin/bash
* Consensus nodes are running in screen sessions, check 'screen -ls'
* neo-python is installed in /neo-python, with a neo-privnet.wallet file in place
* You can use the alias 'neopy' in the shell to start neo-python's prompt.py with privnet settings
* Please report issues to https://github.com/CityOfZion/neo-privatenet-docker
root@b6477e009639:/neo-python#
The banner will tell you that the screen sessions are running the consensus nodes and neo-python is already installed.
Execute a ls and you will see that neo-privnet.wallet is present there. We will run the pre-installed neopy and open the wallet.
neopy
neo> open wallet neo-privnet.wallet
The password for this is coz. To check the balance, execute:
wallet
We have around 100m NEO and 16K gas as promised!
There you go! You have your own NEO private net running over azure. To connect to the hosted private net from a remote client, we need to modify our neo client configuration. That is a story for another day.
This blog is written respective to the features C# 8.0 is suggesting to have. The base for this write up is the following video where Mads Torgersen explains Seth Juarez the newest C# 8.0 features proposed. Please bear in mind none of these features are released or finalized yet.
I felt like this is somewhat of a misnomer since reference types are by default nullable as they can be null and a lot of developer would expect so. Although to be technically correct nullability (Is that a word? Who knows!) is not a mandatory need for all reference types. We are just used to see it that way and thus the naming is correct.
This specific feature points to a fact where someone is actually capable of declaring reference type instances which are not supposed to be null. Even in C# 7.0 we had a proposal where we would be able to declare explicitly non-nullable reference types with the damnit(postfix !) opeartor (I know, I know). By that definition a string! instance is explicitly non-nullable and if you attempt to assign a null to it, the compiler will throw an error. Same was suggested for the case where you are explicitly using a nullable reference type to use it’s value to assign something else. The obligatory Jon Skeet proposal from 2008 (!!) is here.
The problem along the lines were is to make sure no existing codebase ends up being broken. In the video Mads Torgersen points out the same fact somewhat too. The video suggests that in a case where we could explicitly say a reference type can be null.
public string? SomeMethod()
{
    return null;
}
One might argue that we can do that right now. What is the darn difference? Usually in cases where we have methods that can return null as a return value, our only saviour was our luck or the xml documentation for that associated method. This, essentially expresses that specific intent explicitly. Now you know that the method can and potentially will return null as a value in times. And instead of a strict compiler error, C# 8.0 will possibly opt for a warning in case of using nullable reference types. As example:
string test = SomeMethod();
Console.WriteLine(test.Length);
Here the Console.Writeline(test.length) will end up in a warning since we are accessible a possible null without a check. And the compiler is even able to do some fun flow analysis too. In case of the following example:
string test = SomeMethod();
if(test != null)
{
    Console.WriteLine(test.Length);
}
The compiler will be able to understand that the developer actually cared for checking possibly nullability and it will gracefully take the aforementioned warning off! And of course one can also opt to use the elvis operator:
string test = SomeMethod();
Console.WriteLine(test?.Length);
And Mads also talks about the existing codebase being broken, which I like. He offers a warning when we do things like:
string test = null;
The latent intention is to move to a world where regular reference type instantiations will be considered as non-nullable by default.
What about forcefully telling the compiler that you know better when you are accessing a reference type instance which is nullable. The damnit operator comes handy in here.
string? test = null;
if (string.IsNullOrWhiteSpace(test))
{
    Console.WriteLine(s!.Length);
}
Here, we are explicitly telling the compiler that we know better and we can expect a run time failure if we end up being wrong.
Although I love all of these propositions, I still am a tad skeptical on the usage of Nullable struct for the value types. Sometimes it gets really confusing because the nullable value type instances take a null as value but can not act like an actual null natively.
Default Interface Implementation
This one made me a tad confused too. Although Mads said that this is definitely influenced from Java anonymous classes and I somewhat agree but to me what it more resembles is Scala’s traits. The best usability I see here is definitely being able to define a default implementation of a method in an interface. But I think I would have been happier if we had something totally alike anonymous classes in Java.
Just for the sake of some code sample I’m stealing a code section from one of the articles I already have referenced in this write-up. And the code sample itself is self explanatory for any C# developer so I won’t pile on it. You can create default implementations of your method in the interface itself.
And if you do, you don’t have to explicitly implement that method in the classes you implement that interface.
Nevertheless, this is a good approach since it doesn’t break any code written before. Good job there C# team. And of course the run time team too since this actually needed some run time modifications after a long long time.
Asynchronous Enumerables
I think this has been tried before by developers themselves. C# 5.0 was the pioneer of bringing async and await into the world and the beauty of that was to be able to write true asynchronous code with the least of hassle and without any callbacks. What was lacking though is asynchronous enumerations or generators. To get back a sequence of result, your only hope is to get them as a list from the async method. Once again, stealing a snippet:
IAsyncEnumerable<SearchResult> results =
    searchEngine.GetAllResults(query);

foreach await (var result in results) { // ... }
From the very first look, it looks so like Reactive Extensions which started from a Microsoft Research project. And this was actually brought up in the video too. Apparently the biggest difference between Rx and this is the model it works. This is a pull model instead of a push one Rx uses. Rx is responsible for letting the consumers/observers know when there’s something new for an observable. Interesting
I really liked it to be honest. And even more to my liking, the video described a nifty little usecase of combining a push and pull based model. Where you are pulling data asynchronously and also consuming/buffering your data that you are getting from the push based source. Let’s assume we are enumerating a set of tweets every time. If the data source was an observable and we are enumerating on the list of the tweets we have, while we are processing a bunch through our pull based enumeration, we could also be gathering the rest we got from the observable in a buffer. Amazing use case in my opinion.
Extension Everything
Currently C# only supports extension methods. And not to forget all you extend is static methods. I think for small decorations this works well since we don’t have to go through the full decorator pattern ourselves. And C# team this time tried to do something entirely different. Allow me to steal a snippet again before we go into this.
extension Enrollee extends Person
{
    // static field
    static Dictionary<Person, Professor> enrollees =
        new Dictionary<Person, Professor>();

    // instance method
    public void Enroll(Professor supervisor) =>
        enrollees[this] = supervisor;

    // instance property
    public Professor Supervisor =>
        enrollees.TryGetValue(this, out var supervisor)
            ? supervisor
            : null;

    // static property
    public static ICollection<Person> Students => enrollees.Keys;

    // instance constructor
    public Person(string name, Professor supervisor)
        : this(name)
    {
        this.Enroll(supervisor);
    }
}
We can clearly see C# finally took the extends keyword from Java but used it on a more literal context. The keyword extension defines a class to be an actual extension to a class mentioned after the extends keyword. It is basically a simplified sugary decorator. It looks a lot like Partial Classes and it is also brought up in the video where Mads nicely differentiates the two things here. Instead of Partial Classes which needs to be in the same assembly to work on since the compiler will merge them before execution. This Extension Class on the other hand will truly work like an extension. It doesn’t need to be in the same assembly. It bears member methods. Although Mads carefully warned not to expect stateful changes to the original instance from extension classes since that might end up in problematic scenarios. And I kind of agree with him and I already like the syntax proposal. And this actually generates a new type. And as a bonus Mads also talked about being able to extend constructors and overloaded operators. Since the extension is a type itself and we can even implement interfaces in that extension type. For an example, if there is a Person classs and we wrote a extension type PersonExtension for it. it might be possible to implement an interface IEmployee with the type PersonExtension since Person doesn’t do that. And that way we can improvise on how Person could behave it was IEmployee. Amazing indeed. Although these features are still in plan and might not make in C# 8.0 but they are definitely on the roadmap.
I didn’t cover the Asynchronous Dispose since I need a bit more to understand that properly. You can find the gist in the following section. And the records proposal was already there for C# 7.0 proposals. Thus I didn’t cover them.
After I started looking at the core of functional programming here, more and more question followed their ways into my head. It’s pretty common now a days to face new and newer piece of reusable code components on a daily basis. They redefine how things ought to be done. I’m not complaining at all, it is indeed intriguing to see them come forward so fast. And the fun part is all of them follows the principles laid out years ago. Functional programming is no different.
Greek alphabet of coolness, λ
The reason the first word in the title of the blog is lambda because the character is λ is almost synonymous with anonymous methods/functions, almost all the programming language around has the capabilities to create some form of support of constructing lambdas that contain a unit of work. Greek people made even their alphabets cooler than anyone else. And when I started thinking of actually learning a functional language, my first question was why would I need a language that enforces immutability? Can’t I myself keep immutability intact and yet code with the same principles in any other imperial programming language? The answer is yes, sure I can. The point lies somewhere else. Functional Programming is not something really new. It is not something refactored out of imperial programming. In fact, the tale is as old as general/state driven computing as we know it.
Turing and his states
The moment you start talking about computing, you will start living in Alan Turing‘s head. Whatever we build today, whatever we are doing is still following the principles of his infamous computational model Turing Machine. This was his work in 1936 and we still can’t imagine anything out of it. Amazing, isn’t it? A simple tape drive driven machine model is empowering every possible machine you see now. He is indeed the puppet master of computing.
If we look around carefully, everything around is state driven. Object Oriented programming is state driven. Every instance we write of a class is state driven. When you use a cool framework like redux to maintain your application state, you are doing nothing except following the same principles of a basic state machine, especially a DFA. I can’t emphasize this enough, Turing is synonymous to computation.
Now we get into the head of someone else. Someone else named Alonzo Church. Alonzo Church was building a computational model at the same time Turing was working on his own. His computational model was mathematical function driven where every function is a black box, takes an input and drives out an output. Functions can be sent as inputs and every logical relation is based on a simple domain to range mapping. Sounds familiar? Yes, his work was the father of Functional Programming published in the same year, 1936. Alonzo’s model was based off his work on Lambda Calculus. Fret not, the name is scary, the actual thing is way simpler than it sounds, I think it sounds way cooler because the damn name has lambda on it.
The last but not the least amazing part is, Turing didn’t know any of these. And Alonzo was his doctoral advisor. 😉 The whole hypothesis is named after both of them since Turing proved that Alonzo’s model is equivalent of his computational model. And thus Church-Turing Thesis was born.
What is Lambda Calculus?
We are going to take a very very quick tour of lambda calculus. It doesn’t have any traditional calculus-esque constructs in it. There are multiple variants of it. We will only take a quick tour of pure lambda calculus. Just enough to know how functional programming is devised so we can think alike.
If you are not used to context free grammar, this construct tells how a lambda calculus expression is written. It says an expression can be a constant, a variable, a set of expressions and at the very end, the abstract form of lambda calculus that states a definition of a function like:
λx. e
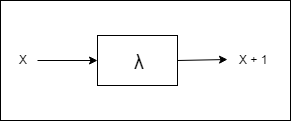
Here, the x is the input parameter and e is the expression. The input parameter is bound in that expression e. And the abstract form of lambda calculus defines a function. Remember this is the definition, it can be invoked and used with real arguments. If this is get all confusing for you, let’s jump into an example. Let’s say we want to define a function that adds 1 to a variable X.
From my perspective we are building a blackbox function that takes one input and converts it to a output.
Now, to express it as a lambda calculus abstract we will use the character λto define the function, x as the input parameter and the output will be x+1. So this will end up in the expression body e. So, it looks like
λx. x+1
We have our first lambda abstract! yay! This is the function definition. To invoke it, let’s say, we want to use 5 as an input argument. The invocation will look like
(λx. x+1) 5
If this is getting confusing again, remember, we don’t have a name for our function here. The definition itself is the name and the body. And the input parameter as x is 5 now. To deduce the next line, we replace x by 5 and we take the λx off.
(λx. x+1) 5
5 + 1
6
This is a very basic sample of beta reduction. Remember lambda calculus only have inputs, expression and the output. It is indeed that simple.
Now, back to programming world. Remember Javascript’s infamous self invoking method?
(function (x) {
    return x + 1;
})(x);
I hope now you see where the principles come from. Amazing. Isn’t it?
The notion of recursion
We are taking a pretty big jump here. Ever wondered how recursions work? We invoke the same method inside of it and we end up in the same place over and over again. Can lambda calculus define recursion?
It can. Lets assume that we have a function λx. x x. And we invoke it with itself as a parameter. So, it looks like:
(λx. x x) (λx. x x)
(λx. (λx. x x) (λx. x x)) (λx. x x) // replacing x x with the (λx. x x) itself (λx. x x) (λx. x x) // by the same rule of beta reduction, we take of the λnotation and the input
We applied beta reduction here but we still ended up in the same place we started. This is called Omega Combinator which is a divergentcombinator since it has no normal form. If you apply beta reduction on it, you will end up in the same construct again. This is basically a simple mathematical model for an infinite loop…pointing to a recursion.
A combinator in a lambda calculus is defined by an lambda expression that has no free variables. What is a free variable you ask? Looks like you want a nice course on Lambda Calculus. 🙂
I found these very helpful if they are read or viewed in order:
If you read/viewed all these already, you probably know this already. The lambda calculus way to self reference a function inside itself is called the Y Combinator. Yeah, mind blown, isn’t it?
Computation is not really far from philosophy or history. It also starts from the alpha and ends in omega. I stay clear of religion but had to mention this. (It sounded cool in my head, doh!)
So, next time you write a lambda to look cool on your codebase or while you are talking to people about the nifty map, reduce and various unit of work methods, pay a little homage to Church and Turing. What they said years ago makes you look cool now.
For a long time, I really didn’t get to treat this blog as my own blog. I mean, sure, I said things I’m enthusiastic about. But I think the purpose of having a blog is not about catching attention rather having a safe place where you can have a dialogue with your mind.
I recently started dabbling with functional programming. I don’t know why though. For long I heard a lot over it from the constant stream of social networks. I never managed to find a reason why should I ever care about this. I think secretly I was afraid if I ever take this up, I might succumb to my curiosity and finally spend time learning things I really don’t need right now. Then again, knowledge never fails.
So, here I am. After spending around 8 or 9 hours of active reading, I barely made a scratch in the surface of it. But it’s a start. My major breakthrough was to be able to get back to that mindset where I could just play with something when I have the least knowledge backing it. It’s a scary game but boy is this fun to play.
Ahoy! functional programming!
The first and foremost notion of functional programming I got from watching people talk about it is that it probably has something to do with ‘functions’ being the first citizen in a programming language. And immutability plays a big part. That lead me to the same place where I started learning programming. I mean I knew “what” was I learning, I did not know “why” I was learning that. I didn’t have the guts to ask because I didn’t know anything about the context. Now, I stand in a corner where I get to ask the question. Why?
Why functional programming is like this?
Surprisingly functional programming didn’t spawn from the concept of programming construct “function” being the first class citizen in a programming language. The fun thing is the word ‘functional’ in the very title doesn’t even point to programming functions. It actually points to mathematical functions. Before I go into that, please allow me to tell yourself to ‘unlearn’ programming as you know it. Especially if you are a person like me who knows imperative programming only. The reason to unlearn what you know is to give you a clean fresh slate to work with. I know that is easier said than done. But as long as you know it and open to see things, you’d be fine!
So, let’s dive in. Let’s assume a simple, very simple mathematical function like the following:
let add1 x = x + 1
For reference I’m using F# here. The two programming languages I want to at least try out is F# and Scala. There’s a solid debate on Scala not being a total functional programming language. But, that is a story for another day. My goal is to understand Apache Spark better in the process too and Scala is just too friendly with it. In the process I’m trying to kill two birds with one bullet. This blog will roughly use F# for reference but nothing here is not understandable even if you haven’t seen F# in your life.
If we have a look at the function here we will see that we are adding 1 to another number here. Any programming language in existence is capable of doing that. What is the difference here except the syntax? This is where I send you back to the “unlearn” step. Let’s see how this is interpreted inside. The F# interpreter will read the function signature like the following:
val add1 : x:int -> int
the val add1 part is self explanatory, we don’t want to worry about that part right now. What about the next part x:int -> int. This is where my imperative programming brain came into work and devised a misleading explanation. And it sounded something like :
The x:int -> int stands for a method signature that takes an input parameter x of type int and it returns another int.
Like I said, this is wrong but it felt legit when I devised it in my brain. The more I delved into it, the more I realized the wrongs in my ways. Years of imperative programming have assembled my neurons to reinforce these concepts as the general means of programming. Since functional programming resorts to mathematical functions, why can’t we see it from that specific aspect?
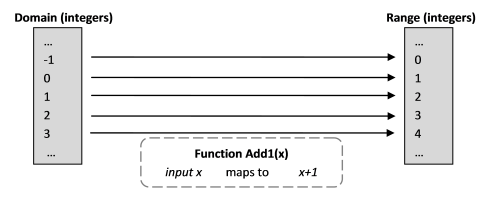
A mathematical function takes a set of values that are used as inputs into the functiondomain and the function maps it to a set of possible outputs. The set of the outputs are called range. All the functions do here is map the inputs to the outputs.
To visualize:
I’m not sure whether I have explained enough how my brain was convinced that it is different. To reinforce that the biggest difference here to look for is the process of doing things. We are transforming the inputs here. Not necessarily returning a value. Mathematical functions transforms inputs, they don’t produce any side effect to the inputs. What I want to mean is if you add 5 and 1 you will get back 6. The input parameter 5 will not have any possible side effect on it. And a mathematical function always gives the same output for a specific given input. My imperative programming brain got it almost right. The right explanation for x:int -> int is an int domain to int range mapping.
The function add1 maps an int input domain to an int range. And for the fact that mathematical functions DO NOT implicate any side effects, it was implicitly important to have immutability embedded inside them. Because if your programming function generates a state or a side effect then it will not comply with mathematical functions. So the implementation layer will fail to comply with the theoretical counterpart. And that is why immutability is vital in functional programming.
I still don’t see the difference
This is really nice and all. But from my imperative programmerbrain’s perspective, is it really that different? If I didn’t take this journey to figure out why functional programming is like this, won’t I be able to write anything in any possible functional programming language? And yes, for sure my brain will be able to. But here is the fun part. What our brain learns implicitly is really hard to explain using the same brain. Otherwise, machine learning will be a piece of cake. My point was to actually try to “know” it, not get habituated to it. Thus when I encounter a problem I can deduce a solution through what I know rather than just plugging constructs I have seen.
Still, I need an answer. Where is the difference? I still see inputs and outputs. Nothing else. My imperative programmerbrain is quite right here, we assign a value to a variable and the function returns a result.
Now, wait a minute and lets see a bit into the word variable and assign. The word variable and assign points to the fact where we use the variable as a placeholder for the actual value . And the concept of assigning a value to a variable points to the concept of storing something in that placeholder. Is it the same here? No. Mathematical methods don’t imply placeholders. It creates a mapping and generalizes that mapping. So saying add1 5 is not assigning 5 to x. It is actually binding 5 to x. The process of binding is not reusing add1. add1 5 is pointing to a method binding that says when I’m invoked you will end up in the range. It looks really the same but it is not. Think of basically doing a string replace where the x is replaced with 5.
Hopefully now you will see more reasons reinforcing immutability. And thus the function name, add1 is not a reusable construct for the function. It’s just a shortcut expression for the range it returns. We are replacing a function value, not the function!
To sum it up the generic function value signature is
val functionName : domain -> range
So, here’s a trick question. How do we define constants then? The answer is writing a function where the range is just the value from any possible domain. 🙂
The motivation behind starting to write again while I learn something goes straight to Chris Smith. He wrote Programming F# and his MSDN blog while he was writing F# is found here. They are highly entertaining and please don’t refrain yourself from looking into them. According to him it is one of the best ways to learn a language and I kind of agree with him despite the fact I lost the courage or interest to do that regularly before.
I also found Learn X in Y Minutes very very fun to have a blind date with a number of programming languages. If I ever get to talk about Scala (that depends on me having time to learn it), I will definitely talk more about this website.
Hope this was entertaining albeit it comprises of boring details! I intend to write a dummies note onthe church-turing hypothesis which essentially blossomed into lambda calculus. Functional Programming is almost directly derived from it. But, it all depends on how much time I will possibly have to cover that. Until then, see ya.
Graph systems are one of the most ubiquitous models found in almost any natural and man-made structures we see everyday. Since computer science evolved around what we see and devise or deduce, graphs do play a huge role in day to day computation and programming techniques. It’s birth dates back to even before it was widely adopted in mathematics since mechanical computing was graph driven implicitly. If only we could get Alan Turing to talk over this.
Before I start, a big inspiration behind this write-up definitely goes to the work of Marko.A.Rodriguez . I was lucky to stumble upon his work while frolicking over the web and his works on graph computing systems and tinkerpop/gremlin is seriously inspiring.
What we are going to do today:
Let’s go right to what we want to do today. Our component of interest is the graph api of Azure Cosmos Db along with Apache Tinkerpop. Azure Cosmos Db has a graph api that allows us to store data as a graph or a network. In simple words, instead of storing data in a tabular format where you have row and column, you can store data as they describe each other in terms of relations. If the text here is not really doing it for you, let’s jump into some examples.
Let’s have a look into this sample graph I made from HIMYM. The big ellipses and boxes here are called vertices and the lines that connect them are called edges. Since we have a little arrow head telling the directions of them, this is actually a Directed Graph. If we look at the data behind the graph, then you can see, we can represent this in two ways. In a table, you can list up the vertices in one table and the edges in other. The edges table might look like:
From
To
Type
Ted
Barney
friend
Ted
Umbrella
found
Barney
Robin
wife
Robin
Barney
husband
Tracy
Umbrella
lost
Ted
Tracy
lost
….
…
…
I didn’t add all the rows of course and if you look at the design you can see it is not properly normalized. That means in understandable terms that we needed a Type table with all the edge types so we don’t write a Type twice. But that is not in this article’s scope. So, let’s ignore that. The thing here to see is, graph nodes/vertices can be of different types and the edges can mean different relationships. Like, here there are vertices that doesn’t represent a character from HIMYM, like the Umbrella and the MacLaren’s Pub. Storing these data in a regular database is possible and has been done many times. This way is called the ‘implicit’ way to store graph like data. Now one might think, by this rule all data in the world can be represented by a graph. And it is indeed true. But we use a graph database only when we see that the data itself focuses more on relations than the data content itself. Like friend graph in a social network website. Or a geographical model of all the offices of a big corporation. The vertices do carry data but the relations are really important here. In these case, a graph database comes in very handy. Azure Cosmos Db recently came up with a graph api and it can store graph data natively where the cost to traverse a graph is constant. In a regular database we have to join multiple tables to formulate these relations properly and in a lot of cases, these computational costs are not constant.
Apache Tinkerpop joins the party:
I hope by now we understand why we need a graph database and now is the right time we talk about Apache Tinkerpop. It was previously known as Apache Gremlin. This is essentially a fantastic graph computing engine which allows you to connect to multiple graph database using a single domain specific language construct. It has language supports for most of the popular languages and it is pretty native to groovy and java. Fret not, we have our way to use it over here with C# too. Before we start we need to create a simple graph database on Azure. The quickstart is here. You can also opt for java and nodejs. I personally used an Azure CosmosDb emulator. The quickstart to install that instead of an actual Azure CosmosDb is here. You can opt for any of these but I have to remind you, at the time this article is being written, Azure CosmosDb Emulator do not support creating graphs and browsing graph data through it’s local web portal. You have to use Gremlin Console to connect and talk to the local emulator. Gremlin Console is a command line REPL that you can use to traverse a local gremlin/tinkerpop graph or a remote one. It can connect to any gremlin servers anywhere as long as you have the credentials. You can use the gremlin console to talk to the actual Azure CosmosDb graph database. I suggest using Windows Subsystem For Linux (WSL), better known as “Bash on Ubuntu on Windows” for using gremlin-console. The gremlin console quickstart is here.
Our sample data set today:
We are going to use the movie review data set from grouplens from here . We are using the small dataset of about 100,000 ratings applied to 9,000 movies by 700 users. If you download and unzip the data you will see multiple csv fields. Of which I only used the movies.csv and ratings.csv files. I made a separate users.csv file for the users list. Don’t worry, all these are attached with the sample code. The movies csv comes with the movie id, movie name and genres column. The ratings.csv comes with the user id, movie id and a rating column where the user has rated the movie from 0 to 5. The sample code has a simple command line uploader tool that will let you upload the data in your desired gremlin server and graph database connected to it. So, to understand how we talk to gremlin, let’s have a peek at the code, shall we?
Let’s talk code:
I’m not going to focus on the full source at a time. Let’s have a look on how can we connect to an existing Azure CosmosDb Graph database. First, we create a DocumentClient.
DocumentClient client = new DocumentClient(
 new Uri(endpoint),
 authKey,
 new ConnectionPolicy { ConnectionMode = ConnectionMode.Direct, ConnectionProtocol = Protocol.Tcp });
Definitely the thing that you will notice missing is the authkey variable here. And that is actually the primary key of your graph database that you will find in your azure portal. If you use the emulator they use a fixed key which you will find in the quickstart link I shared above.
Now that we do have a DocumentClient let’s upload the sets of movies that we will use for reviews. I’m using the movie name and the movie id for the sake of simplicity here. In our graph, the movie vertices/nodes will have a label ‘movie’. This sets the type of the vertex and we will set the name and id as properties of this vertex. The id uniquely distinguish any vertex. So remember, no matter what the label of the vertex is the id has to be unique. Or Azure CosmosDb will let you know that it can not add a vertex because already a vertex of that same key exists. If you don’t provide an id property, Azure CosmosDb will generate one and put it on the vertex.
We make sure at the beginning of the upload to drop the existing graph database if there is any.
The database name I used for these sample is graphdb and the collection name is Movies. Pardon me for my indecency to hard code these but it’s a sample code, so I put effectiveness in front of decency.
Adding vertices to our ‘Movies’ graph:
Now, we upload the movies. Of course make sure we create the database if it’s already not there.
        private async Task UploadMovies(DocumentClient client)
        {
            try
            {
                Console.WriteLine("Uploading movies");
                Database database = await client.CreateDatabaseIfNotExistsAsync(new Database { Id = "graphdb" });

                DocumentCollection graph = await client.CreateDocumentCollectionIfNotExistsAsync(
                    UriFactory.CreateDatabaseUri("graphdb"),
                    new DocumentCollection { Id = "Movies" },
                    new RequestOptions { OfferThroughput = 1000 });

                Console.WriteLine("Connected to graph Movies collection");

                Console.WriteLine("Reading movie list");
                using (TextReader reader = new StreamReader("movies2.csv"))
                using (CsvReader csv = new CsvReader(reader))
                {
                    while (csv.Read())
                    {
                        string idField = csv.GetField<string>(0);
                        string titleField = csv.GetField<string>(1);
                        titleField = JsonConvert.ToString(titleField, '\"', StringEscapeHandling.EscapeHtml);

                        Console.WriteLine("Uploading " + titleField);

                        IDocumentQuery<dynamic> query = client.CreateGremlinQuery<dynamic>(graph, $"g.addV('movie').property('id', '{idField}').property('title', {titleField})");
                        while(query.HasMoreResults)
                        {
                            await query.ExecuteNextAsync();
                        }
                    }
                }
            }
            catch (DocumentClientException ex)
            {
                Console.WriteLine(ex.Message);
            }
        }
For the collection, same strategy is followed. We get a DocumentCollection instance trying to create the Movies collection if it doesn’t exist or just fetching the existing one if there is one already. Then we start reading the csv file. We use the same DocumentClient instance to create a gremlin construct to add a vertex/node in the collection for each of the movies. We add a Movie label along with the title and id property as promised. I want to focus a little bit in the gremlin/tinkerpop construct we used here.
Let’s ignore the idField and titleField as we already know what is there. The first construct g stands for the graph in the collection. addV(‘label’) is the method construct to add a vertex. You can see the whole construct is design wise fluent. The next two property(propetyName, propertyValue) construct adds two properties in the newly added movie node. Nice builder interface, isn’t it? Pretty expressive. We are using the groovy standard constructs for gremlin. There are *other language constructs too, including javascript. And following the same approach, I uploaded the users in the sample code too.
By the time of writing this article, the whole connector library from nuget is in preview version and I don’t have one for .net core. So, we need to sit this one out for .net core. Sorry for that.
Connecting the vertices with edges:
The next thing in line is of course to add edges that represents the relationship between an user and a movie. We label the relationships with ‘rates’ and also will add a property named weight and it’s value will be the actual rating value given by that user.
        private async Task UploadReviews(DocumentClient client)
        {
            try
            {
                Console.WriteLine("Uploading movie reviews");

                DocumentCollection graph = await client.CreateDocumentCollectionIfNotExistsAsync(
                    UriFactory.CreateDatabaseUri("graphdb"),
                    new DocumentCollection { Id = "Movies" },
                    new RequestOptions { OfferThroughput = 1000 });

                Console.WriteLine("Connected to graph Movies collection");

                Console.WriteLine("Reading review list");
                using (TextReader reader = new StreamReader("ratings2.csv"))
                using (CsvReader csv = new CsvReader(reader))
                {
                    while (csv.Read())
                    {
                        string userId = "user" + csv.GetField<string>(0);
                        string movieId = csv.GetField<string>(1);
                        float rating = csv.GetField<float>(2);

                        Console.WriteLine("Uploading review for user " + userId + " to " + movieId + " with rating "+ rating);
                        IDocumentQuery<dynamic> query = client.CreateGremlinQuery<dynamic>(graph, $"g.V().hasLabel('user').has('id', '{userId}').addE('rates').property('weight', {rating}).to(g.V().has('id', '{movieId}'))");
                        while (query.HasMoreResults)
                        {
                            var result = await query.ExecuteNextAsync();
                            foreach (var item in result)
                            {
                                Console.WriteLine(item);
                            }
                        }
                    }
                }
            }
            catch (DocumentClientException ex)
            {
                Console.WriteLine(ex.Message);
            }
        }
The only noticeable change here in this snippet that we created edges between a movie and an user vertex. Like before, let’s zoom in the gremlin construct we used this time to create an edge between two nodes.
The first enumeration g.V() should enumerate all the vertices in the graph. We need to filter the user vertex first to create an edge from. The next hasLabel(”user) filters all the user vertices. Subsequently .has(‘id’, ‘{userId}’) filters the vertex of the user we want bearing that user id. Then we use addE(‘rates’) method to ensure that we add an edge labeled ‘rates’ from it. The following property(‘weight’, {rating}) should add the weight property with the rating as value on the edge we just created. The last thing we do is to tell where this edge points to. With to(g.V() .has(‘id’, ‘{movieId}’)) we filter out the movie node we want and use it to define which vertex the edge points to. Decent huh? You can find the full tinkerpop reference here.
By now a single user rating a movie should look something like:
Finally, we have all our data ready. Time to traverse this graph and make a simple movie recommendation for any user. 🙂
The simplest movie recommender system in this world:
Let’s devise a simple movie recommender and we will follow the dumbest real life approach we see around. Usually when I pick a movie to see, I pick a movie based on the movies I have already seen and liked. If I liked Deadpool, there’s a very good chance I will like Deadpool2 and other superhero movies like Logan. Remember we didn’t add/use any genre data in our graph. All we have here are the users, the movies and the ratings made by the users on these movies.
So, let’s find out the other users who likes the same movies as our reference user do. Our reference user is the user who has asked for a recommendation for movies that he should see from us. He has only given us a list of movies he saw and rated. Our current traversed graph should look like this:
We want to traverse the users who like the same movies our reference user likes using gremlin. To construct the query, first we need to get out of our user vertex and find out movies that our user likes. The gremlin construct for that will be:
Let’s assume our reference user id is user7. And at first we filter the vertices with label user and id user7. After that we use outE(‘rates’)to traverse edges that is labeled rates and has weight more than or equal to 4.5. That’s how we will land on the nodes that we think the user likes. But right now, we are standing on the edges. To land on the movie nodes, we have to use:
inV() construct will enumerate all the attached movie nodes with the rates edges. The as(‘exclude’) construct is used for a specific purpose. For now, all I can say is, I’m marking all the movies I saw as ‘exclude’. We will see why I’m doing this soon.
So, now we want to find out all the other users who likes the movies our reference user likes.
So, this is where we want to end up. We found user2 and user3 likes the same movies almost as much our reference user likes. To progress through gremlin, our new gremlin query is:
We added a InE(‘rates’) construct since we want to know now which inward edges with label ‘rates’ are pointing to these movies our reference user likes. We also filter the edges more with weight property value greater than or equal to 4.5 since we only want users who likes the same movies. At last we added outV() to find the users attached to these edges. Now we are standing on the users who likes the same movies our reference user does.
We want to know what other movies these users likes that our reference user has not rated or seen yet. I’m assuming our reference user rated all the movies he has seen.
From the graph above we can clearly see that user3 and user2 likes movie4 and movie5 that our current user has not rated yet. These are viable candidates for our users movie recommendation. It definitely seems naive, but it’s a start. If you remember about the exclude nodes, we are going to use these now to make sure that our recommender doesn’t recommend the movies our user already has seen. Our desired gremlin query is:
We traveled the movies all these other user likes and made sure that we exclude the ones we have already seen using where(neq(‘exclude’)). To fix our naivety a little bit, let’s take the distinct movies using dedup() and order it by the movies by the amount of ratings it has received.
This has to be really really naive to survive any production requirement. But it is indeed an eye opener on how Apache Tinkerpop and Azure CosmosDB Graph databases can do.
If you look on the final query quickly you will see we ordered the final movie nodes by the count of incoming rates edges it has and ordered it in a descending order using order().by(inE(‘rates’).count(), decr). We limited the nodes to first 10 and we only took the titles of the movies.
Putting the system to test:
I wrote a simple REPL to try out various gremlin commands towards our Azure CosmosDb. Our reference user id was ‘user7’. The list of the movies seen by our reference user is:
If it is too hard to read, let’s put out the movies here:
“Braveheart (1995)”
“Star Wars: Episode IV – A New Hope (1977)”
“Shawshank Redemption, The (1994)”
“Wallace & Gromit: The Best of Aardman Animation (1996)”
“Wallace & Gromit: A Close Shave (1995)”
“Wallace & Gromit: The Wrong Trousers (1993)”
“Star Wars: Episode V – The Empire Strikes Back (1980)”
“Raiders of the Lost Ark (Indiana Jones and the Raiders of the Lost Ark) (1981)”
“Star Wars: Episode VI – Return of the Jedi (1983)”
“Grand Day Out with Wallace and Gromit, A (1989)”
“Amadeus (1984)”
“Glory (1989)”
“Beavis and Butt-Head Do America (1996)”
The movies our simple recommender suggested are:
“Forrest Gump (1994)”,
“Pulp Fiction (1994)”,
“Fargo (1996)”,
“Silence of the Lambs, The (1991)”,
“Star Trek: Generations (1994) “,
“Jurassic Park (1993)”,
“Matrix, The (1999)”,
“Toy Story (1995)”,
“Schindler’s List (1993)”,
“Terminator 2: Judgment Day (1991)”
Clearly this is not the best recommender engine, but definitely one of the simplest. We can always reuse the genome data along with the dataset and the genre data and do a proper collaborative filtering. But the scope of this article was just to demonstrate the capabilities of a simple graph traversal.
Hope it was fun to read. Try out Azure Cosmos Db Graph Api and Apache Tinkerpop if you can. They are really fun together to use to and there’s so much you can do using simple graph traversals.
The sample code is hosted here in github. Until next time!
For all the REST resources we deploy out every day, one of the most common scenario a developer ends up handling is designing a nice and effective search/filter/query endpoint for these aforementioned resources. Usually in these scenarios conventions play a big part and that starts from query filter parameters in the query string to using a full blown search engine like ElasticSearch, Lucene or Algolia. Vinay Sahni did a phenomenal job for putting out the gist for basic REST practices here. If you are new into REST and want to get yourself started talking REST, it’s worth a look.
Today, we will do a simple yet fun experiment. Our goal today is to create a simple nifty looking query language for a sample REST resource. We will try to mimic a couple of features Twitter Search Api provides and our sample data storage today will be Azure Cosmos Db: Document Db which previously was known as just Azure Document db. Recently it moved to the Azure Cosmos Db family and if you have missed it, here is the full details.
Therefore, the first thing we need is a set of sample data we can use as our REST resource. Since we are going to mimic the twitter public search api, we definitely need some sample data first. And of course github comes to the rescue. Download the sample data and put it to your own document db instance. If you don’t know how to create a document db instance, follow the quick start here. I’m referencing the link to the .net quick start, but there are node.js, Python, Java and Xamarin resources right by the side of it. For those of you who do not want to test your work against an Azure hosted document db and want to test Azure document db locally, you can always opt for the azure document db emulator.
Now, for the sake of this experiment I ported the github twitter sample data to an azure document db instance. It has 10 entries in that small data set and hosted here. If you want to browse the data, azure portal does allow it. But I suggest looking at this open source app here named Azure DocumentDB Studio. You can use the endpoint and the key written in the sample code in github to connect. The database is public just for you guys so you can test the sample code I have hosted in github and will list out in the end of this article. TL;DR people, this is your cue to go to the end of the article, but I highly suggest to stick around.
Features to be built:
Out of all the features twitters search api provides, I will port the to:UserAccount, from:UserAccount and “exact text” search capabilities. That means, We will be able to search tweets sent from one account to other and we will also be able to search tweets by mentioning a string we like to be present in the tweets. For an example if we want to find tweets
If you have an eye for detail, you will notice that this is not exactly like the twitter search api since doesn’t use an and operator. But for the sake of the simplicity in this example this should be enough.
Tools we are going to use:
Our api stack will be written in asp.net core. We will use ANTLR as our query language lexer-parser. If you need an ANTLR primer and another experiment I did with it, please have a look here where I tried to gobble up a simple scripting language. If you are not really accustomed to any of .net stacks, fret not. All of these are totally doable in any other tech stack you will possibly prefer to use. Since ANTLR has targets for multiple languages, api can be built in basically any language and even for our sample storage solution azure document db here, you have access to multiple client SDKs.
The data:
As I mentioned above, we have a little data set of 10 entries. I’m posting a sample entry here so the rest of the tutorial makes sense. One entry points to a single tweet made by a sample user.
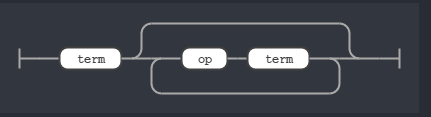
It’s a small and simple grammar like the one we used in our scripting language tutorial. Since our REST resource query is essentially an expression, our entry rule will be expr. The railroad diagram for expr looks like:
Rule expr
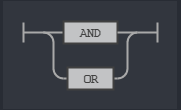
This means we can have a single search term or multiple search term chained by a op rule. The op rule is nothing but the two relational operator we support: AND and OR.
Rule op
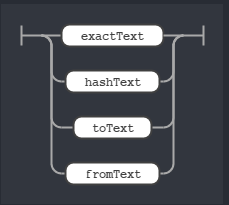
Along side of the op rule we also need to know what the term rule stands for. The term rule stands for the search term format we are allowed to use. In our sample query stated above, we have terms like from:terminator, to:robocop, “I’m back” or a hashtag like #HastaLaVista. That’s why we have 4 rules defining all of these cases and the term rule is a OR relationship between them.
rule term
I’m not going to post the railroad diagram for toText, fromText, hashText and exactText rules since they are pretty self-explanatory if you have a cursory look at the grammar.
So, what are we waiting for? Let’s start writing our little codebase that will parse this query string and translate it to an azure document db SQL that we can use to fetch the tweets. For that, we need a small repository that will connect to our desired database and collection in document db and will let us fetch some items. I only added methods that will allow us to read the tweets and connect to the database. I ignored the rest since you can always have a look at those in the quick start for azure document db.
Here’s our small rough database repository. Please remember to keep your endpoint and key strings somewhere secret and safe in production environment, since this is a tutorial, I went with what is easy and fast to go for a proof of concept.
namespace TweetQuery.Lib
{
    using System;
    using System.Collections.Generic;
    using System.Threading.Tasks;
    using Microsoft.Azure.Documents.Client;
    using Microsoft.Azure.Documents.Linq;

    public class CosmosDBRepository<T> where T : class
    {
        private readonly string Endpoint = "https://tweet.documents.azure.com:443/";
        private readonly string Key = "fjp9Z3qKPxSOfE0KS1aaKvUY27B8IoL347sdtMBMjkCQqPmoaKjGXoyltrItNXNN6h4QjAYLSY5nyb2djWWUOQ==";
        private readonly string DatabaseId = "tweetdb";
        private readonly string CollectionId = "tweets";
        private DocumentClient client;

        public CosmosDBRepository()
        {
            client = new DocumentClient(new Uri(Endpoint), Key);
        }

        public async Task<IEnumerable<T>> GetItemsAsync(string sql)
        {
            if (string.IsNullOrEmpty(sql))
                throw new ArgumentNullException(nameof(sql));

            FeedOptions queryOptions = new FeedOptions { MaxItemCount = -1 };

            var query = this.client.CreateDocumentQuery<T>(
                 UriFactory.CreateDocumentCollectionUri(DatabaseId, CollectionId),
                 sql, queryOptions)
                 .AsDocumentQuery();

            List<T> results = new List<T>();
            while (query.HasMoreResults)
            {
                results.AddRange(await query.ExecuteNextAsync<T>());
            }

            return results;
        }
    }
}
I opted for executing a SQL instead of a linq expression since constructing SQL is easier and simpler for a tutorial. Plus it decouples the query structure from compile time POCOs that we use as our models too.
I created a DocumentDbListener class based off the SearchBaseListener which was auto-generated from our ANTLR grammar. The sole purpose of this class is to generate a simple SQL against our search expression. To search inside nested arrays, I used a user defined function for azure document db. All of these are very crudely written, so forgive my indecency. Since this is just a tutorial, I tried to keep it as simple as possible.
function matchArrayElement(array, match) {
    for (var index = 0; index < array.length; index++) {
        var element = array[index];

        if (typeof match === "object") {
            for (var key in match) {
                if (match.hasOwnProperty(key) && element.hasOwnProperty(key)) {
                    var matchVal = match[key];
                    var elemVal = element[key];

                    return matchVal == elemVal;
                }
            }
        }
        else {
            return (element == match)
        }
    }

    return false;
}
All this method does is it tries to find nested array elements based on the match we send back. You can achieve the same result thorough JOINs in Azure Document Db or Array method ARRAY_CONTAINS, but I preferred a user defined function since it serves my purpose easily.
Constructing SQL from the query expression:
To understand how the SQL is generated from the query expression, let’s begin with the to:UserAccount expression. Since we start with the rule expr, let’s override the SearchBaseListener method EnterExpr first.
namespace TweetSearch.CosmosDb.DocumentDb
{
    using Antlr4.Runtime.Misc;
    using TweetSearch.CosmosDb.Util;

    public class DocumentDbListener : SearchBaseListener
    {
        private string projectionClause = "SELECT * FROM twt";
        private string whereClause;

        public string Output
        {
            get { return projectionClause + " " + whereClause; }
        }

        public override void EnterExpr([NotNull] SearchParser.ExprContext context)
        {
            this.whereClause = "WHERE";
        }
    }
}
The approach I took here is essentially the simplest. I handle the events fired the moment ANTLR enters a specific rule and I keep appending the SQL string to the whereClause. Since, entering the expr rule means that I will need a where SQL clause, I initialized it with “WHERE”. The thing to notice here is instead of concatenating I chose to initialize it because I expect this event to be fired exactly once since that is how the grammar is designed.
Following the same trail the next thing to handle will be the EnterTerm event. But, term is nothing but an OR relationship between 4 other rules. Handling them specifically gives me the edge since they produce simpler and smaller readable methods. For example, if we want to handle the to:UserAccount expression, a simple method like following should be sufficient for our use case.
This is where our user defined function also comes in play though. I’m trying to find any tweet that has an user mention to the parsed user account I fetched from the query.
By following the same rule I completed the rest of the four rules and my full listener class looks like:
namespace TweetSearch.CosmosDb.DocumentDb
{
using Antlr4.Runtime.Misc;
using TweetSearch.CosmosDb.Util;
public class DocumentDbListener : SearchBaseListener
{
private string projectionClause = "SELECT * FROM twt";
private string whereClause;
public string Output
{
get { return projectionClause + " " + whereClause; }
}
public override void EnterExpr([NotNull] SearchParser.ExprContext context)
{
this.whereClause = "WHERE";
}
public override void EnterFromText([NotNull] SearchParser.FromTextContext context)
{
var screenName = context.GetText().Substring(5).Enquote();
this.whereClause = string.Concat(whereClause, " ", "twt.user.screen_name = ", screenName);
}
public override void EnterOp([NotNull] SearchParser.OpContext context)
{
var text = context.GetText();
this.whereClause = string.Concat(this.whereClause, " ", text.ToUpper());
}
        public override void EnterToText([NotNull] SearchParser.ToTextContext context)
        {
            var screenName = context.GetText().Substring(3).Enquote();
            this.whereClause = string.Concat(whereClause, " ", $"udf.matchArrayElement(twt.entities.user_mentions, {{ \"screen_name\" : {screenName} }} )");
        }
public override void EnterHashText([NotNull] SearchParser.HashTextContext context)
{
var hashtag = context.GetText().Enquote();
this.whereClause = string.Concat(whereClause, " ", $"udf.matchArrayElement(twt.entities.hashtags, {hashtag})");
}
public override void EnterExactText([NotNull] SearchParser.ExactTextContext context)
{
var text = context.GetText();
this.whereClause = string.Concat(whereClause, " ", $"CONTAINS(twt.text, {text})");
}
}
}
We got our listener ready! Now, all we need is a context class that will bootstrap the lexer and parser and tokens so the input expression is transpiled and the output SQL is generated. Just like our last work on ANTLR, the TweetQueryContext class will look like the following:
namespace TweetSearch.CosmosDb.DocumentDb
{
    using Antlr4.Runtime;
    using Antlr4.Runtime.Tree;

    public class TweetQueryContext
    {
        private DocumentDbListener listener;

        public TweetQueryContext()
        {
            this.listener = new DocumentDbListener();
        }

        public SearchParser.ExprContext GenerateAST(string input)
        {
            var inputStream = new AntlrInputStream(input);
            var lexer = new SearchLexer(inputStream);
            var tokens = new CommonTokenStream(lexer);
            var parser = new SearchParser(tokens);
            parser.ErrorHandler = new BailErrorStrategy();

            return parser.expr();
        }

        public string GenerateQuery(string inputText)
        {
            var astree = this.GenerateAST(inputText);
            ParseTreeWalker.Default.Walk(listener, astree);
            return listener.Output;
        }
    }
}
Whew! That was easy, right?
Bootstrapping the api layer:
We have all we need except the api. Thanks to asp .net core, that is two clicks away. Open Visual Studio and open a .net core api project. Our TweetsController class looks like the following:
namespace TweetQuery.Controllers
{
    using Microsoft.AspNetCore.Mvc;
    using System.Threading.Tasks;
    using TweetQuery.Lib;
    using TweetQuery.Lib.Model;
    using TweetSearch.CosmosDb.DocumentDb;

    [Route("api/[controller]")]
    public class TweetsController : Controller
    {
        private CosmosDBRepository<Tweet> repository;
        private TweetQueryContext context;

        public TweetsController(CosmosDBRepository<Tweet> repository)
        {
            this.repository = repository;
            this.context = new TweetQueryContext();
        }

        [HttpGet("search")]
        public async Task<IActionResult> Search([FromQuery] string q)
        {
            if (string.IsNullOrEmpty(q))
                return BadRequest();

            var querySql = this.context.GenerateQuery(q).Trim();
            var result = await repository.GetItemsAsync(querySql);
            return Ok(result);
        }
    }
}
I reused the db repository we created earlier and as you see that is dependency injected in the controller which you have to configure in the ConfigureServices method in your Startup class. I’m not adding that specific code here since it is already in the sample code and doesn’t belong to the scope of this tutorial. Same goes for the model class Tweet and the classes it uses inside.
Time to test!
The project is hosted here in github. Clone the code, and build and run it from your visual studio. As a sample query try the following:
http://localhost:5000/api/tweets/search?q=to:hatena_sugoi AND from:maeta_tw OR %23HopesUp OR "Surely June is a summer"
I url-encoded the hashtag here just to be nice on the REST client you might use. I highly suggest Postman if you don’t want anything heavy.
I only took the minimalists way of using ANTLR here, you can build your own expression tree based on the auto-generated listener and can do so much more if you want. A perfect example will be LinqToQuerystring written by Pete Smith. It generates the necessary LINQ expression for any IQueryable and thus allows you to write database agnostic Odata driven queries and it’s tons faster and lighter than the one Microsoft ships.
For everyone of us who wakes and codes everyday somewhere in this world, we often find ourselves pretty attached to the programming language we love most. All of us feels that point of idiosyncrasy when we try to break our boundaries and try to learn something new since this field is always expanding and evolving like a universe on steroids.
For those who still are newbies and is trying to find ways to understand how a programming language works, what could be better than trying to make one of your own? 🙂 This post is essentially a small proof of concept where we will go for a small nice fun looking esoteric programming language.
Before we jump into the very tidbits inside, allow me to explain what we will do here. We will write a small programming language that is parsed and lexed by ANTLR, transpiles to C# and the transpiled code is fed into Roslyn C# script api.
If the aforementioned words are looking too wordy for you, let me clear it right up for you. Like every language we use to talk every day, programming language comes with a grammar itself. It should be clear as a daylight to you if you have written a single line of code in your life. Every programming language follows a pretty defined structure and a dancing parade of words following that. So, since we are creating one, the first thing we need is that grammar for our language. Instead of doing it from scratch, our tool of choice is ANTLR, which stands for “Another Tool for Language Recognition”. ANTLR will help us to define the grammar, generate the lexer and parser for it and we will eventually be able to reuse those components to transpile our code to C#. Remember ANTLR do support for javascript, java, python too. So, if you want to have your lexer and parser defined in those languages, please don’t refrain yourself from using this.
Now, even before we start talking about languages and everything else, we need to understand a bit about compiler theory. Now, I can go into gory details of lexer and parser but since this is an age of google, I will let that responsibility fall in your hand. We will take somewhat of an exploratory way to understand how everything works and take it from there.
Let’s assume that we have a language like this:
derp a = 20 ':)' #Initialization

# basic if-else
a > 2 ???
yep ->
    a = 5 ':)'
kbye

# print
dump a ':)'
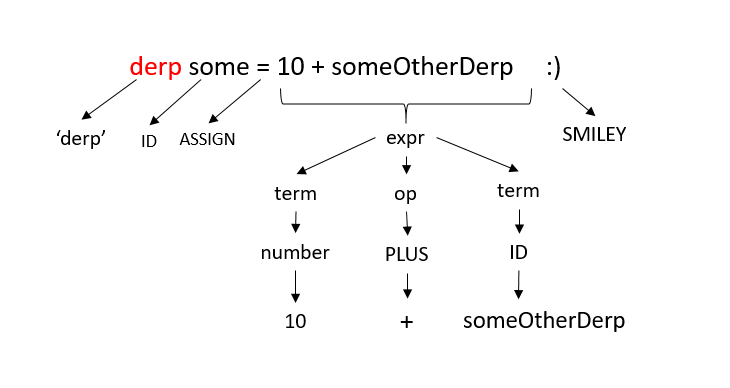
The first thing we need is a grammar. To understand the programming language we need something that understands all the words here. And that guy is the lexer. A lexer eats up the whole code block we send to the compiler, chops that into little lexemes (read strings/words here). So we can understand when we have hit a specific keyword. Like for our dummy language here, we used the popular internet lingo derp to initialize a variable.
The next thing in line to do is making some meaningful excerpt from the words. Like when we write a if block, the compiler needs to know what strings of characters or words should stand together to construct a meaningful statement or expression. That is the job of a parser. If you see closely, you will see that every block of code can be expressed as a tree. For example, the initialization block here looks like the following:
This is definitely a single branch tree, it says you need to write the word derp to start the statement and you should end it with a smiley ( 🙂 ) to finish the statement. In the middle you use an identifier (name for your variable) and an ASSIGN operator (=) to define the flow of assignment from right to left. That tree is actually generated straight from the grammar we are going to use today.
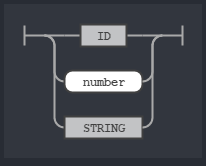
So, why wait? Let’s have a look at the grammar we are going to be using today:
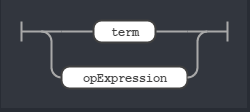
Now, my first advice here will be to not get confused by the size of the grammar and start taking out bits we do understand at first. If you refer to the first image in this and have a look at the grammar you will see that the rule assignstmt is defined the exact same way depicted in the picture. If you find the words ID, ASSIGN and SMILEY, you will also see that all of them are defined in the grammar below where they have their literal form. These tokenshelps the parser to understand what you have written. And the assignstmt is called a rule, which define relations among different tokens or rules. See? this is how we build rules for our grammar. Because a grammar is nothing but a set of well defined rules.
By the very first rule named compilationUnit,our language is nothing but a set of statements ending with an EOF. Every statement can either be a printstmt (for printing), ifstmt (if-else) or the aforementioned assignstmt. Neat huh? You can even go down and find out how the rest of the tree is built.
I strongly suggest using Visual Studio Code and its ANTLR4 extension for writing ANTLR grammar files. You will have nice looking railroad diagram like the one I posted for every rule you write!
Time to get our hands dirty. Fret not since the whole project is publicly available over github so I will only point out excerpts of the code that we need to visit. And I’m going back to the same assignstmt. First thing we need to do is download ANTLR . Go to the download page and download the latest .jar. ANTLR is written in Java so you will need to have java installed in your machine. We will use .net core here for the rest of the work so you can download that for your OS too. When you are done downloading ANTLR you can generate the target code for C# from your grammar file. In our case the grammar file name was Profane.g4 and to generate the C# lexer and parser based off the code all we had to do is invoke :
It will generate the C# classes you need for walking through the grammar. You will see a lexer and a listener class being created. You don’t really need to touch the lexer class. The listener class is used to handle events that are fired when ANTLR encounters a rule. So, to make use of our assignment statement we need to handle the event that is fired when ANTLR encounters our assignstmt rule. But how will we ever understand which event is that? Here comes the ANTLR magic.
ANTLR will generate the event you need for all your rules every time you create a lexer and parser from your grammar. That means every time you change your grammar you need to regenerate the C# targets again, the lexer and listener class. I added the command in the build target for the sample project so it will automatically do it on build.
So, lets create a class inherited from ProfaneBaseListener class which was auto generated by ANTLR and name it ProfaneListener. Since our rule was named assignstmt ANTLR will generate a method called EnterAssignstmt inside it which will be invoked every time ANTLR encounters that type of statement or that rule. Our target here is to generate equivalent C# code from it so
derp some = 10 ':)'
will be transpiled in C# equivalent code like the following.
dynamic some = 10;
And we are going to do that in the method EnterAssignstmt which ANTLR has built out for us. Let’s have a look at it.
        public override void EnterAssignstmt([NotNull] ProfaneParser.AssignstmtContext context)
        {
            string target = context.ID().GetText();
            dynamic value = this.ResolveExpression(context.expr());
            this.Output += "dynamic " + target + " = " + value + ";\n";
        }
This is really simple work here. We are asking the context class to give us the ID and the expression so we can generate the equivalent C# code string. The nice thing you can notice here is ANTLR has generated class for our assignment statement context itself. But what is that ResolveExpression method. If we remember the rule it was :
Rule assignstmt
Here expr is another rule. Which looks like.
Rule expr
That means, expr can either be a rule named term or a rule named opExpression. Let’s have a look at both of them.
First is the rule called term. A term can be an identifier (the name for your variable), a number (int or float) or a string. Either one of these.
Rule term
That means that term can also be a valid value for rule expr. Since expr is either term or opExpression
The opExpression on the other hand is a tad complex one. This is an example where you can reuse multiple rules to create a complex rule.
The only thing that we don’t know here is the op rule. the opExpression rule says it is structured as term followed by a rule named op and there has to be another term in the end.
Rule op
The op rule defines an OR relationship between PLUS, MINUS and ASSIGN which stands respectively for ‘+’, ‘-‘ and ‘=’. That means this rule says we can write things like
derp some = 10 + 2 + someOtherDerp 🙂
Amazing! Isn’t it?
Before we look into the ResolveExpression method, let’s see a nice looking tree on how that previous statement actually gets parsed by all these rules.
This will hopefully help you to understand how things are happening here. Now, lets see the ResolveExpression method which transpiles the rule expr.
        private dynamic ResolveExpression(ProfaneParser.ExprContext exprContext)
        {
            var opExpression = exprContext.opExpression();
            if (opExpression != null)
            {
                return ResolveOpExpression(opExpression);
            }
            else
            {
                return ResolveTerm(exprContext.term());
            }
        }

        private dynamic ResolveOpExpression(ProfaneParser.OpExpressionContext plusContext)
        {
            var leftTerm = plusContext.term().First();
            var rightTerm = plusContext.term().Last();

            var left = ResolveTerm(leftTerm);
            var right = ResolveTerm(rightTerm);

            return left + plusContext.op().GetText() + right;
        }

        private dynamic ResolveTerm(ProfaneParser.TermContext termContext)
        {
            if (termContext.number() != null)
            {
                return termContext.number().GetText();
            }
            else if (termContext.ID() != null)
            {
                return termContext.ID().GetText();
            }
            else if (termContext.STRING() != null)
            {
                Regex regex = new Regex("/\\$\\{([^\\}]+)\\}/g");
                var contextText = termContext.GetText();
                var replacedString = regex.Replace(contextText, "$1");
                return replacedString;
            }
            else return default(dynamic);
        }
We also see two new methods the ResolveExpression method uses named ResolveTerm and ResolveOpExpression. They generate the transpiled C# code for term rule and opExpression rule. We keep adding the generated code in a string named output and when it’s done we have our C# transpiled code ready to be executed.
Executing C# as a script using Roslyn:
Now that we have our C# code to be executed, we will use another tool called Roslyn. It is a compiler tool for .net that gives you rich set of features regarding code analysis and compilation. We will specifically be using the C# scripting api.
First we need to generate the AST for our code. If you are scratching head on what an abstract syntax tree is, you already saw something like it in the tree we posted before. To generate the tree, you need your lexer. Your lexer will generate tokens. Your parser will use those tokens to start the execution unit you need to compile your code which is the root node for your tree. This is still done using ANTLR.
When you have your tree, you need to walk on it. When you walk on the AST, the listener fires the events we need to generate the transpiled code like we did minutes ago. So the listener output is our C# code which we need to feed to roslyn.
Roslyn C# script engine comes with a nifty class named CSharpScript which will do the trick for you. All we have to do is to feed the C# code and load the assemblies we will need. Then, it will do its magic and we will have our own scripting language talking to us.
So, our transpiler class looks like
public class ProfaneTranspiler
{
private ProfaneListener listener;
private static readonly MetadataReference[] References =
{
MetadataReference.CreateFromFile(typeof(object).GetTypeInfo().Assembly.Location),
MetadataReference.CreateFromFile(typeof(RuntimeBinderException).GetTypeInfo().Assembly.Location),
MetadataReference.CreateFromFile(typeof(System.Runtime.CompilerServices.DynamicAttribute).GetTypeInfo().Assembly.Location),
MetadataReference.CreateFromFile(typeof(ExpressionType).GetTypeInfo().Assembly.Location),
MetadataReference.CreateFromFile(Assembly.Load(new AssemblyName("mscorlib")).Location),
MetadataReference.CreateFromFile(Assembly.Load(new AssemblyName("System.Runtime")).Location)
};
public ProfaneTranspiler()
{
this.listener = new ProfaneListener();
}
public ProfaneParser.CompilationUnitContext GenerateAST(string input)
{
var inputStream = new AntlrInputStream(input);
var lexer = new ProfaneLexer(inputStream);
var tokens = new CommonTokenStream(lexer);
var parser = new ProfaneParser(tokens);
parser.ErrorHandler = new BailErrorStrategy();
return parser.compilationUnit();
}
public string GenerateTranspiledCode(string inputText)
{
var astree = this.GenerateAST(inputText);
ParseTreeWalker.Default.Walk(listener, astree);
return listener.Output;
}
public async Task&amp;amp;amp;lt;TranspileResult&amp;amp;amp;gt; RunAsync(string code)
{
var result = new TranspileResult();
if (string.IsNullOrEmpty(code))
return result;
Stopwatch watch = new Stopwatch();
watch.Start();
try
{
ScriptOptions scriptOptions = ScriptOptions.Default;
scriptOptions = scriptOptions.AddReferences(References);
scriptOptions = scriptOptions.AddImports("System");
var resultCode = this.GenerateTranspiledCode(code);
if (resultCode == null)
{
watch.Stop();
result.TimeElapsed = watch.Elapsed.ToString();
return result;
}
var outputStrBuilder = new StringBuilder();
using (var writer = new StringWriter(outputStrBuilder))
{
Console.SetOut(writer);
var scriptState = await CSharpScript.RunAsync(resultCode, scriptOptions);
result.output = outputStrBuilder.ToString();
}
}
catch (Exception ex)
{
result.output = ex.Message;
}
finally
{
watch.Stop();
result.TimeElapsed = watch.Elapsed.ToString();
}
return result;
}
}
I uploaded the full sample code in github here. You need to build and run the Profane project which is a console app. It will host a small web api in port 5000. If you POST your code to the endpoint as plain text in the POST body, you will get back the output of your code. Postman can be a nice client to do so.
Hope this was fun. Knowing the internals of your daily programming language essentially boosts up the confidence while you write it. So make your own esoteric language if you have time. It’s always fun to make em.
Before I start writing this, I must say this is probably the first time I’m treating this blog like I want it to be treated. Most of the time I wrote things people only cares about when they want their problem fixed. For the last couple of months or a year I didn’t even write much. It seems that socials has taken a big chunk of my time and now I’m trying to get out of that addiction.
Money, papers with vengeance
Around 4 years ago, I gave into the concept of working for money. Money talks, doesn’t it? It talks louder than anything else. So, that was it for me. I went out with a little help of someone I know, went into an interview, practically said I would do anything to get some money and started working.
I started working on perl. It’s a nice little language (believe me, it took a long time for me to come to this verdict). Nice and amusing as it is, it was indeed mischievous. For a guy who doesn’t know much about linux or any unix per say, it was a hard time to cope up and get going. Boy, I hated it in the beginning. I used to mail my superior almost everyday to make sure that someday he ports me somewhere I can write something C#.
The fact I liked Windows so much wasn’t a fun party either. The internet is right now is full of sages. Sages who are so opinionated about everything so that unless you don’t come in terms with what they believe, they’d literally treat that act as a blasphemy. Boy, I even had a facebook page dedicated for trolling me and one of my very close mentors. Fun times, I still don’t know who was behind that. Wish I knew. But that’s another story for another day.
Present is a gift, a confusing gift indeed
Right at this point of my life, I’m probably the most confused as ever. When I was a kid, i saw my mom and dad work, work like hell. Just trying their best to put everything in place and make the ends meet. And the worst part of this is now I understand the necessity of it. I really didn’t at that time. Now I don’t have an excuse for being this person. Now, I don’t know what I am supposed to be.
It’s really funny. When I was a preteen or a teen all I ever wanted to become is a musician. That is of course before life came in and hit me in the nuts. That is when your dreams go down the drain and you start doing the thing you’re good at and the one that makes money. I was no different at all. I’m lucky that I’m passionate about it. Otherwise I don’t know what would happen.
Know thyself
When you start to understand who you are, two things will happen. You’d know your limits, you’d be a good friend to yourself. The worst part of all of this is, it would make you aware of everything. It would take away the spontaneous sets of emotions since now you can pretty much predict what your brain would do.
Love and its baggage
Boy, this shit confused me more than anything else ever did in my life. I lost and gained a lot through love. For me I think it had to do a lot with finding your own purpose. When one person becomes a lot more important than any goal you ever chased, when that very person becomes your prime directive. And your brain goes to a hyperdrive. It starts to calculate all possible memories you could make with her. Its a tree your brain loves to parse. But beware, it also comes with attachments. For me it was even scarier, my childhood was insanely lonely and I basically grabbed anyone I saw that I imagined can play a part in my life. Scary, huh? Well you haven’t heard the scariest part yet. The moment you drop your guards all the insecurities will show their ugly heads. A person you want you around would see you as you truly are. That is sometimes perceived wrong on the other side. At some point you’d get scared to open up. Because you don’t know what it will cost you. It would only make you feel no one wants to be around you just because it is you. And that thought itself would isolate you from the rest of the world just like that.
To obligations and beyond
Obligations are the shittiest thing you’d ever encounter. They’d make you pay, I tell you. You look at your family, you see obligations. You look at the person you love most, you feel a drive to make things better for her. Fuck me, I can’t find anyone with a pair of eyes I don’t have to pay anything. I don’t owe anything. For hell as I sure,I don’t owe anything to this world. I dont. People talk about priorities. Trust me priority is a two way street. It only meets when both of them starts to work towards each other. Much like a bidirectional a star search.
Freedom from life itself
Rules never worked on me. Probably never will. My brain is a child with always asking “Why”. And I hate the fact that it does that. Not that it helps it anyway , it still does that. Youd think Kurt Cobain was wrong. I don’t see it that way. I don’t know why I have a twisted sense of judgement. The pursuit of happiness is said to be started when you leave your expectations behind. What if I expect to find something that will unbind me from expectations?
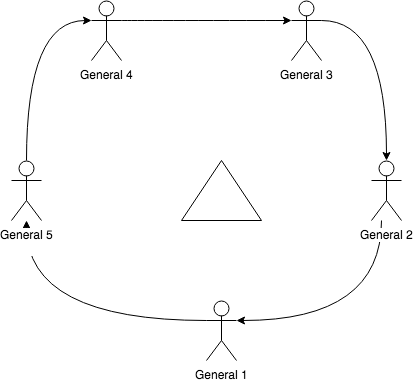
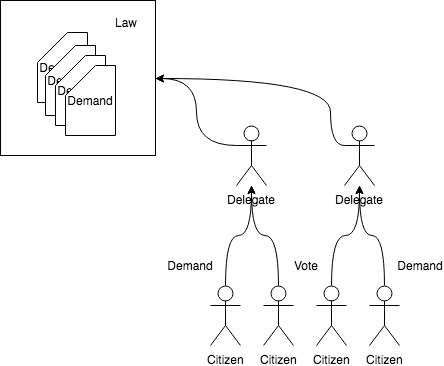
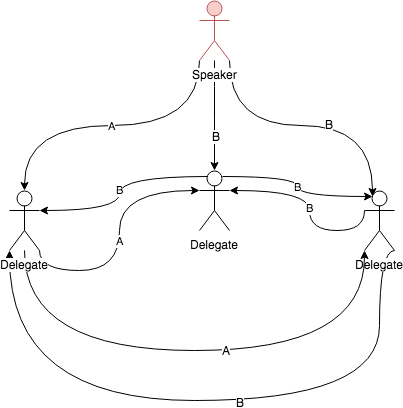
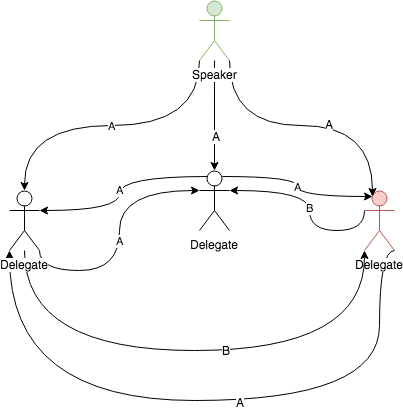

 When that is taken care of, we will move to the final validation stage and create the VM. Now from the information found newly created resource page we would go ahead and ssh into the newly created VM.